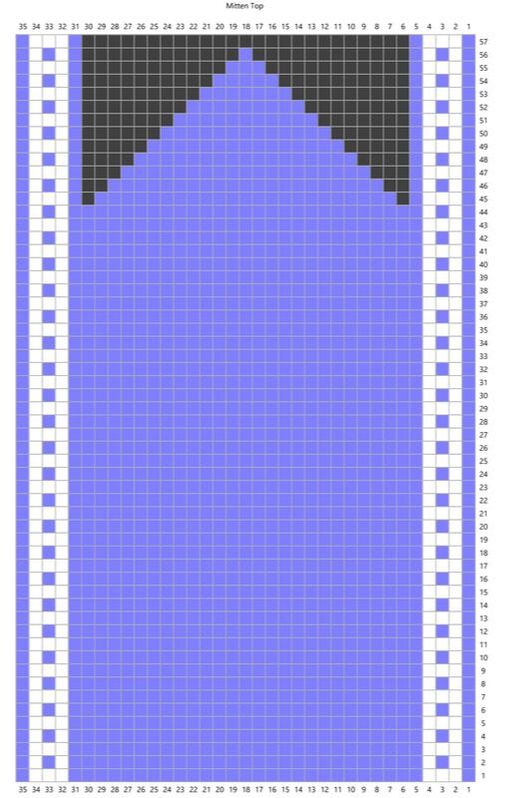
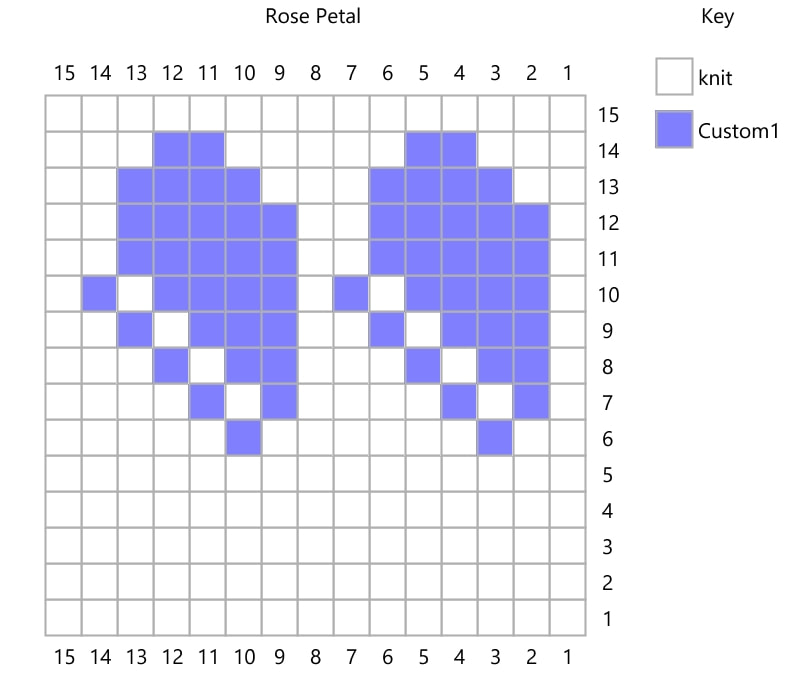
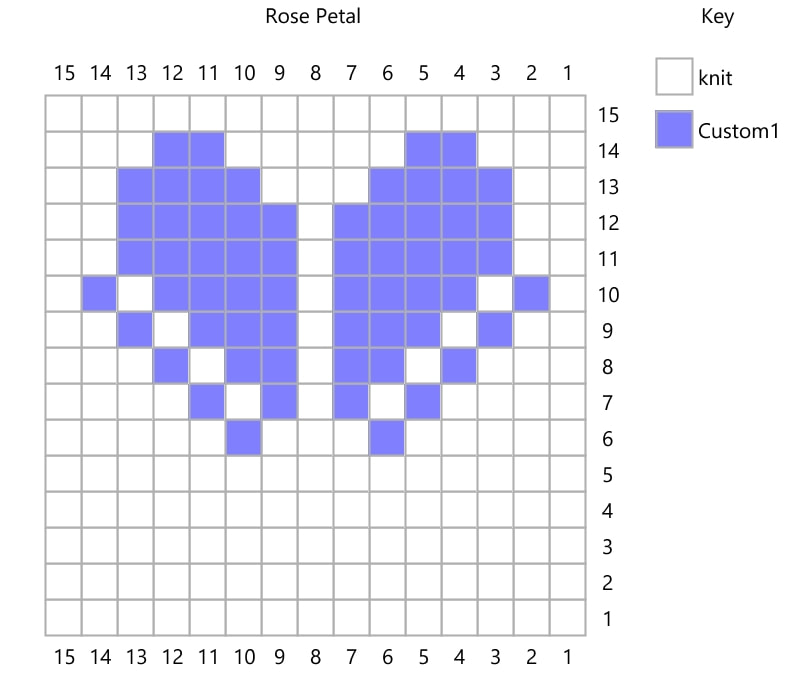
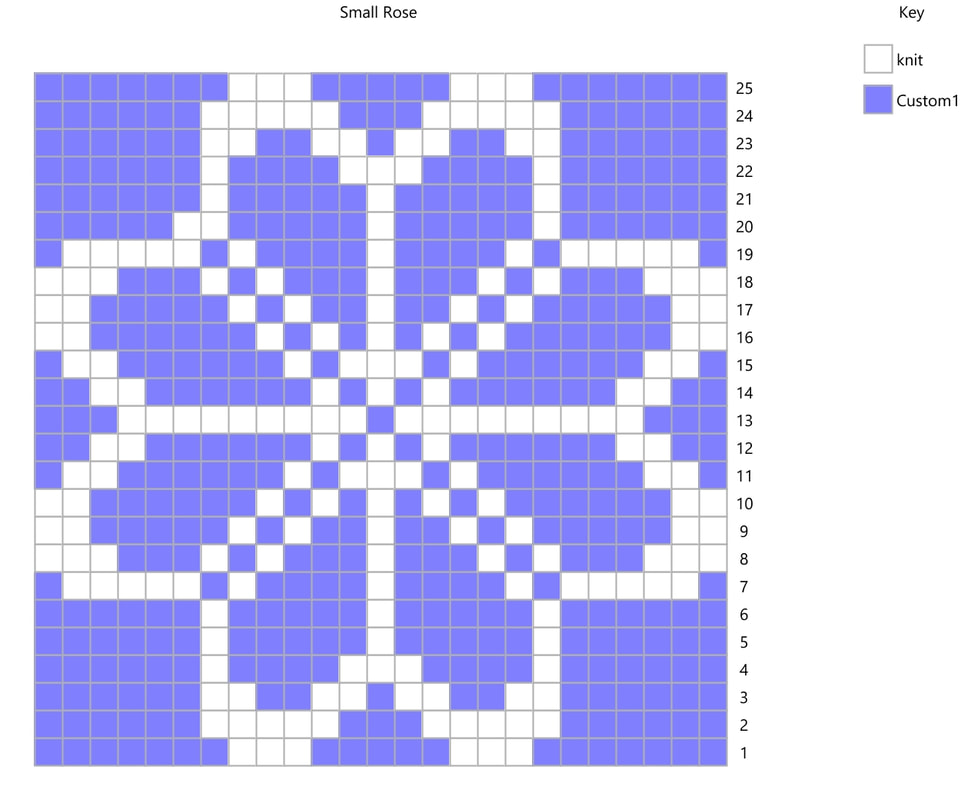
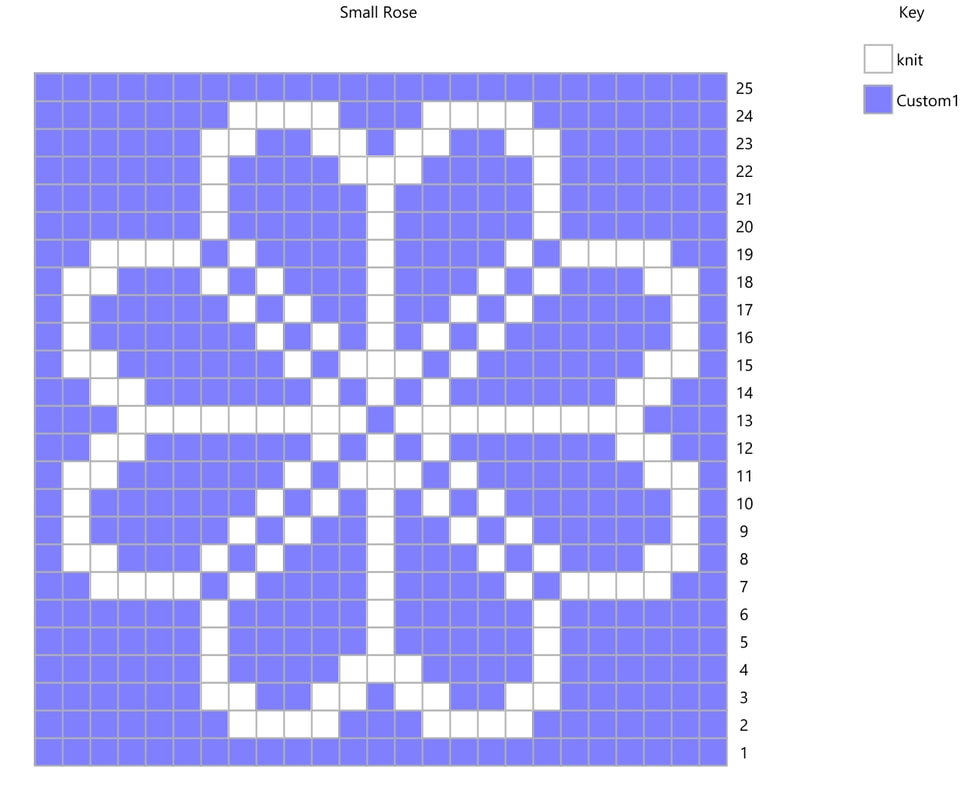
 In my last post, I shared how to modify the size of a stranded colorwork motif. In this post, I'll share how to use it in a repeat with a simple mitten design. In this pattern, the dark gray/black square represent no stitch. There are decreases in the pattern to form the mitten top which are not noted in the chart - this is to give clarity in the colors. The set of five stitches at the left and right edges of the pattern form a border at the sides of the hand. They do not change, but as the decreases shape the top of the hand, they will slope inward. 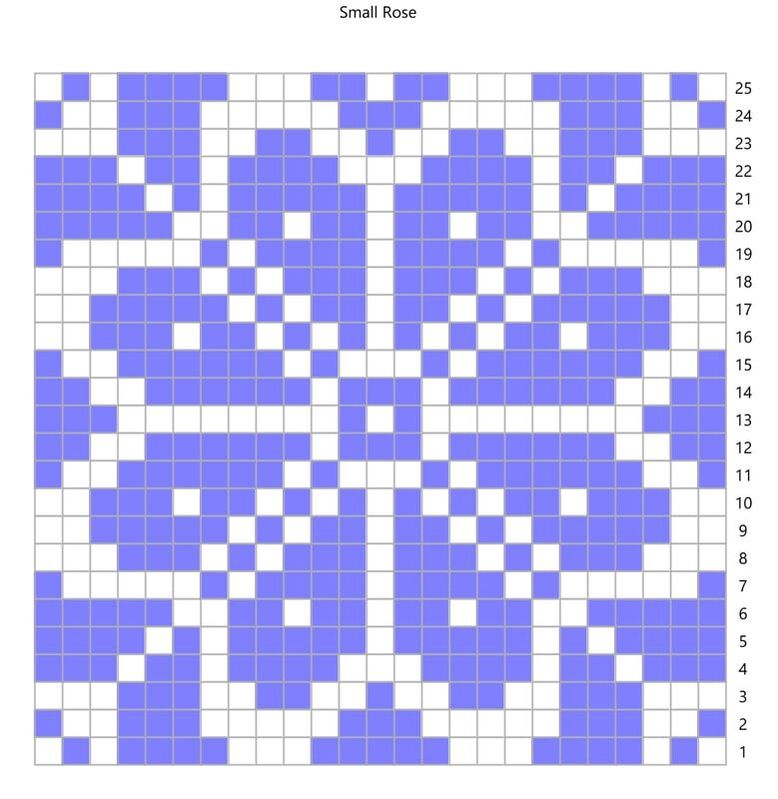 The first step in setting up a pattern repeat is to simply repeat the pattern. Here, I'm using a variation on the pattern I shared in my last post. 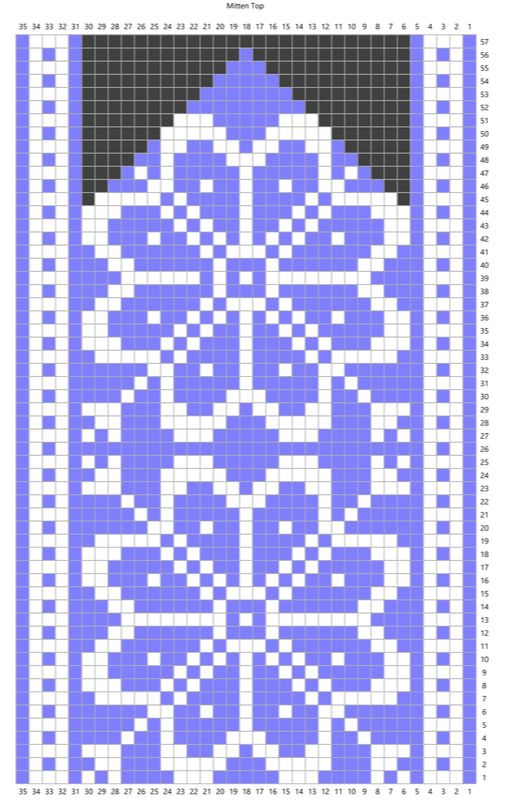 Stacking the pattern on top of itself, we get two repeats of the rose. The outer corners at the top of the rose are cut off. This is fine, as long as the rose itself fits fully into the pattern. (If it didn't we'd need to go back and adjust.) It seems like the white of the rose petals falls off the edge of the pattern. However, because the borders are edged in the background color, there will be a purple border around them. 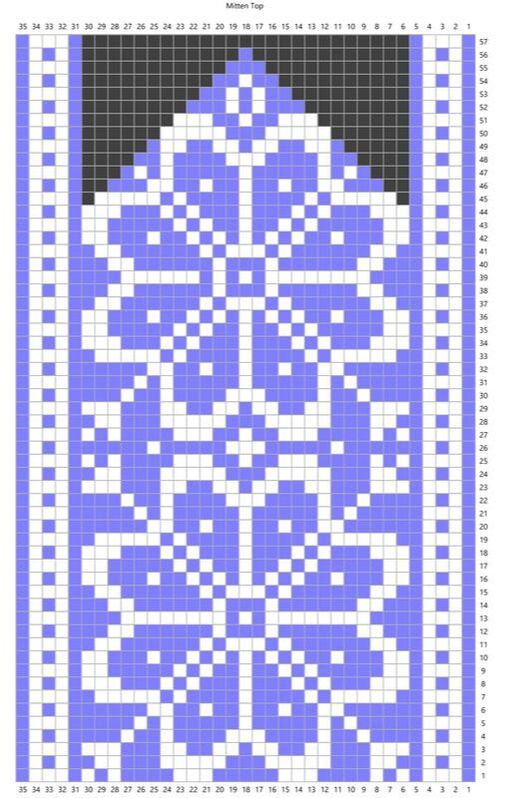 Usually, when you repeat a large motif, there are places that end up with very long floats. The next step is to create new, smaller motifs to prevent these floats. Here, I've added a small cross and two dots between the motifs to prevent long floats. At the top, there is a lozenge shape to fill in the space. Your options at this step are limited only by the number of stitches you have and your imagination. And that's really all there is to it!  Have you ever fallen in love with a stitch pattern, but it's not quite the right size? In this post, I shared how to resize a cable pattern. Today, I'll share one approach to modifying the size and design of a stranded colorwork pattern. This is a great technique to use if you're using handspun yarn that doesn't exactly match the gauge of a pattern, or if you need to substitute yarn. In this example, I'm sizing down, but it would be just as easy to make the stitch pattern larger with these same ideas. 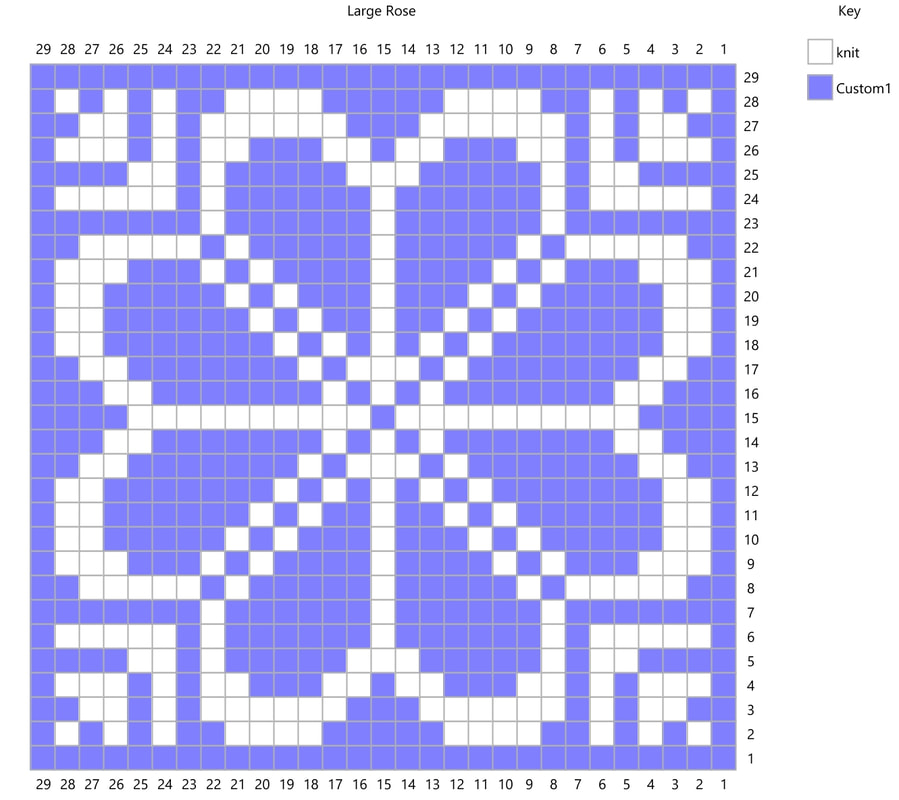 In this example, I started with a 29-stitch-square repeat of a traditional Norwegian 8-petal rose. I liked this pattern, but needed a stitch pattern that would fit into a 25-stitch square. The easiest, and most obvious choice in my situation was to remove the border of solid color stitches, which took me down to 27 stitches. I still needed to reduce 2 stitches on each side, and chose to start with the petals. 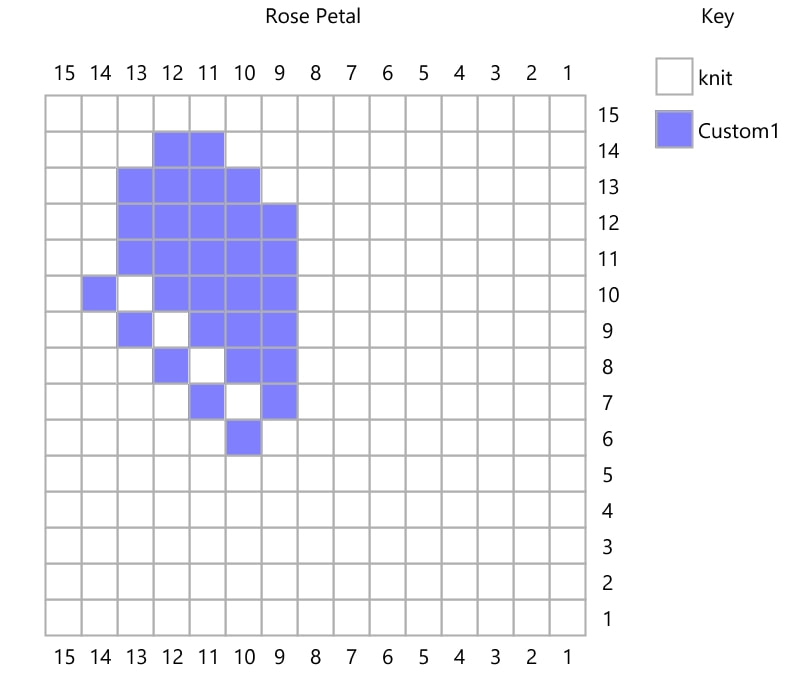 By drawing a petal that has one less row and one less column, I've reduced the size of the pattern. Expanded over the entire repeat, this will get me to the right number of rows and stitches.
At this point, it would be totally fine to draw out the rest of the pattern by hand. However, a little bit of copy/paste/rotate action saves a lot of work. This also helps to make sure that any inconsistencies get repeated (which is how patterns are made).
The next step is to fill in the outer petals. You'll notice that in the image on the left, the petals touch the outer edges. This isn't a problem if they touch a border that is the same color as the background. However, to make sure the pattern is clear, you can make the outer petals thinner, as in the image on the right. 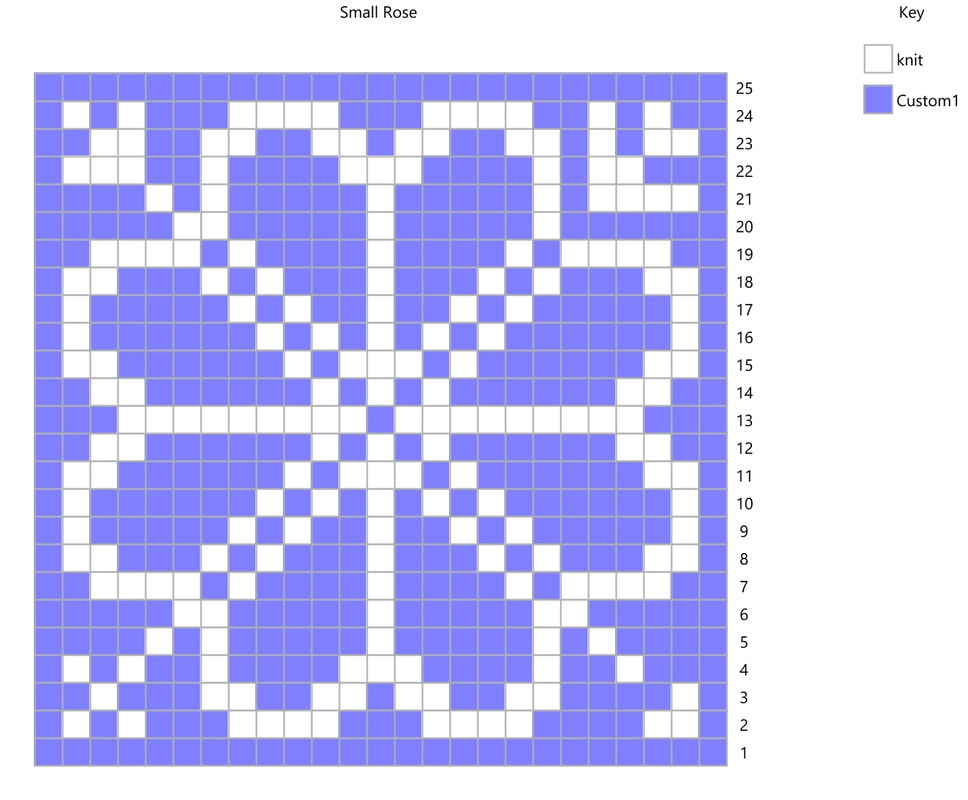 Now it's time to fill in the corner patterns. Because there are fewer stitches to work with than in the original, this pattern must also be adjusted. There are lots of options - I've placed a different pattern in each corner to show the possibilities. Normally you will choose one pattern and repeat it in each corner. At this point, the pattern is fully resized and you're free to use it in your pattern, or you can continue to play around with modifications. 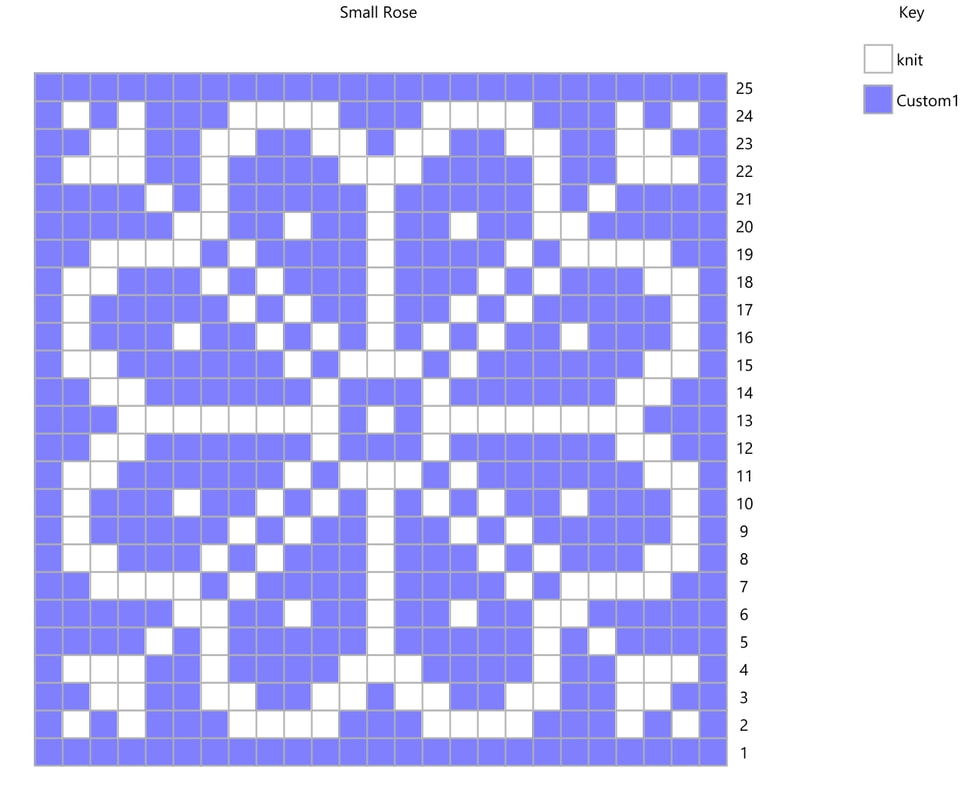 Here I've updated all the corner patterns with my favorite design, modified the center of the rose to be a little less busy, and added dots at the center of each petal. It's easy to play all day with modifying stitch patterns on graph paper or on the computer, but nothing beats a swatch! Because a knit stitch isn't exactly square, it's important to check your pattern in a swatch to make sure it will turn out the way you want it to. After that, the next step is to place your new design into the pattern you want to use, which will be the topic of the next post. 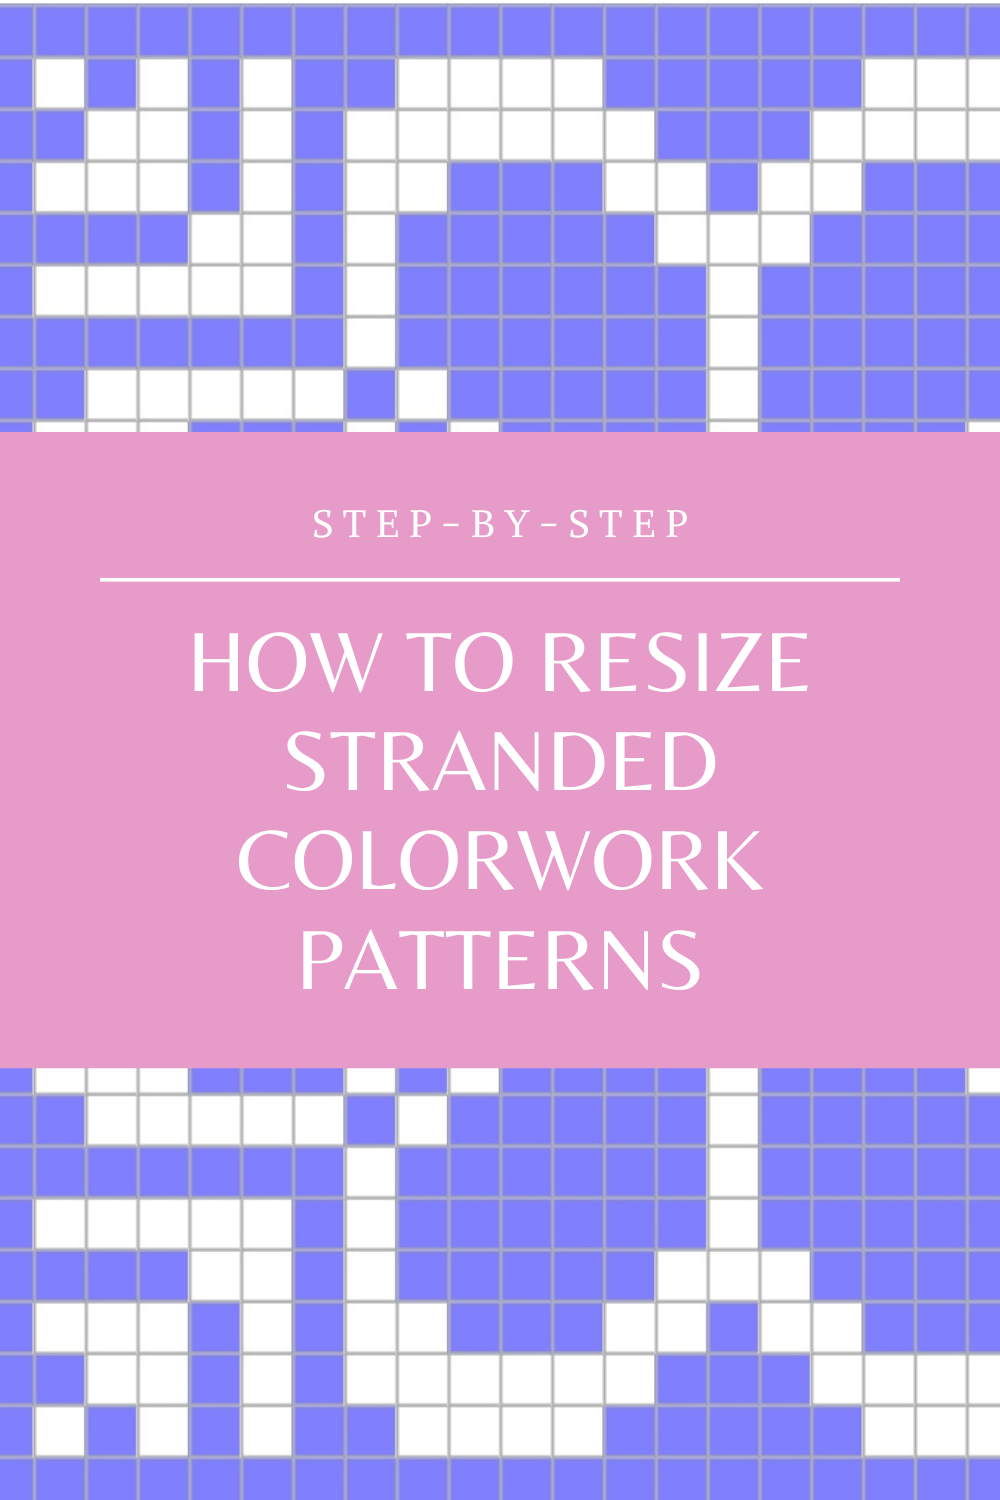 Here is the fourth episode of the Fiber Sprite Podcast! On this show, I'll talk about projects I've been working on and my visit to the Taos Wool Festival.
Knitting:
Designing:
Spinning:
Weaving:
Books: 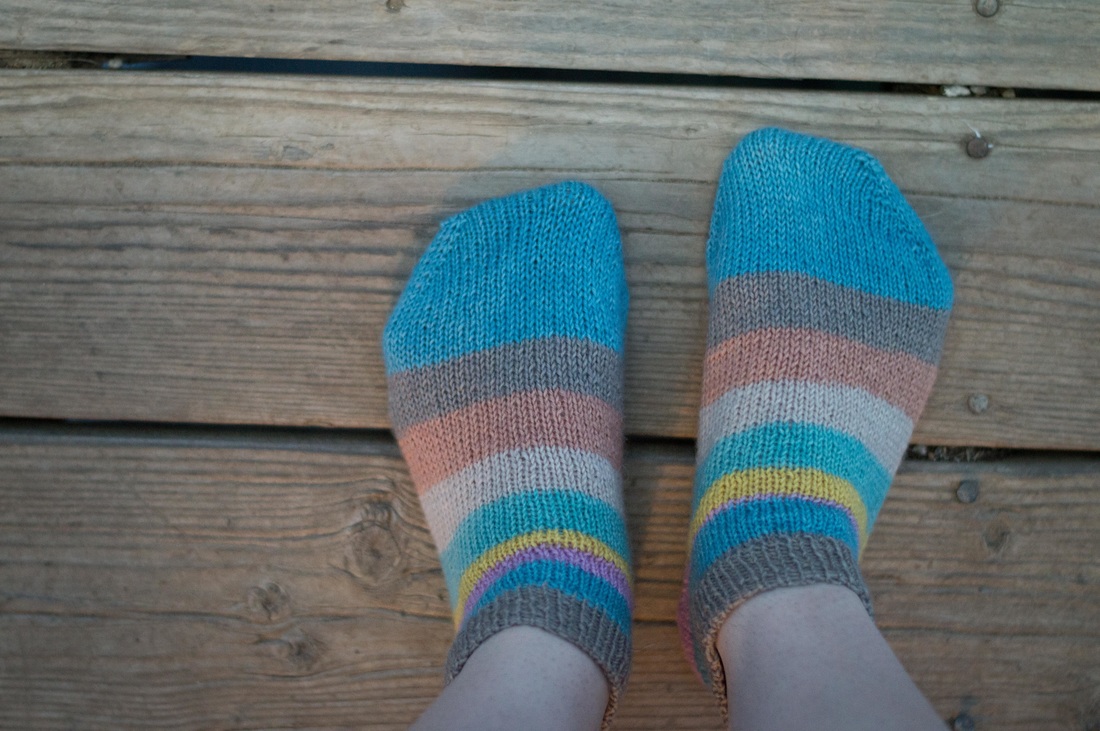 Like many other knitters who just so happen to knit socks, I suspect I'm a bit of a sock snob. Most knitters ascend to sock snobbery when they catch the sock knitting bug. Why buy socks when you can make socks that will fit perfectly and last longer? It's an easy choice for most sock knitters. But I was doomed from the start. My nickname growing up was "Socks." (Really.) I loved all the different cute little socks. There was a different pair of socks for every occasion, every outfit. And then in college for three whole years before becoming a sock knitter, I worked in a store that sold SmartWool socks. And you have to know the merchandise, so I bought a pair in just about every color. (For you non-sock knitters, they're pretty durable. I still have almost all of them, and they're still in great shape.) With all these predispositions to sock snobbery, the minute I got the hang of sock knitting, I was a goner. Now I have no fewer than 18 pairs of handknit socks in my sock drawer, in every color of the rainbow. For years after I started knitting socks, I made them or less as directed in the pattern. I managed to learn a few different methods of heel and toe shaping, but that was about it. Socks always went up to the normal mid-calf height, and that was that. 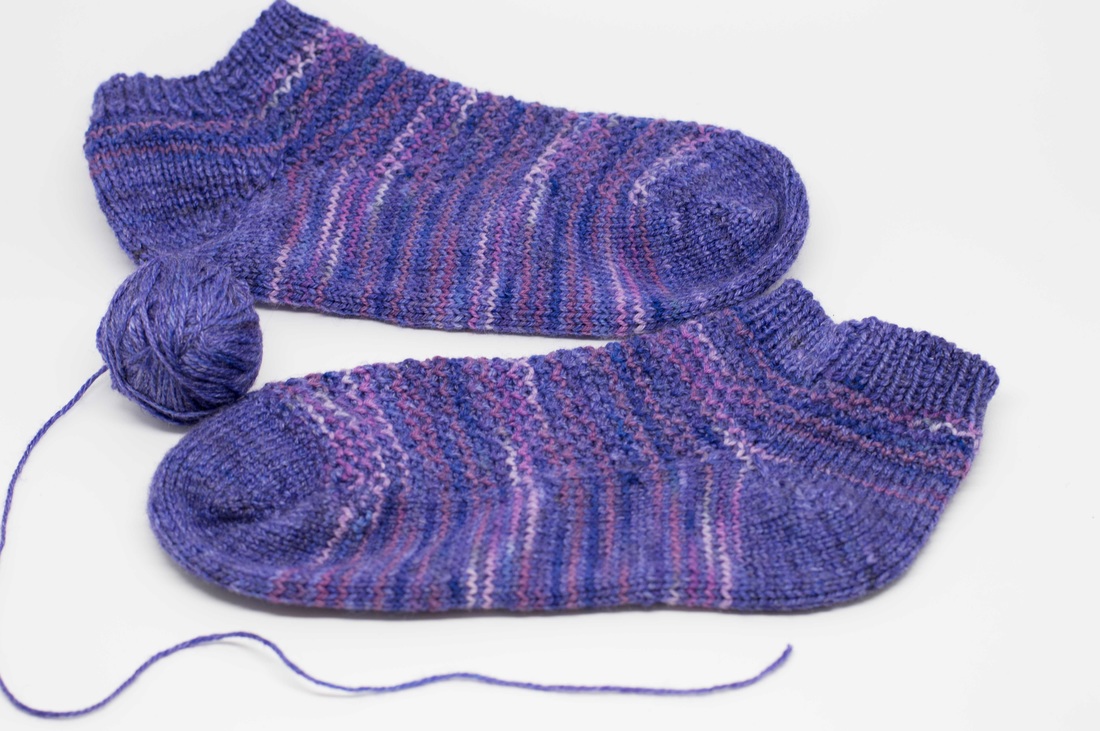 But that's not really my sock style. If I had to choose, it would be ankle socks almost every time. Early on in my sock knitting adventures, I tried to knit ankle socks and failed miserably. No matter what I did, handknit ankle socks always slipped down into my shoes and drove me crazy. I figured handknit ankles socks just couldn't be done. I was wrong. To make non-slippy-sloppy ankle socks, you simply need to make the cuffs just a little bit longer than you think you should have to. My cuffs usually end up somewhere between 2 and 2 1/2 inches from the top of where I turned the heel (using short rows). 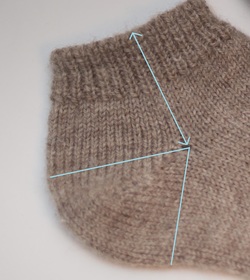 The wedge shows where the short rows are worked. The arrows show the distance from the top of where the heel is turned to the top of the cuff. Somewhere between ten and twelve rounds of K1, P1 ribbing on the cuff seems to be the magic number for me, but if you wanted more elasticity, you could work in K2, P2. I do like to have at least a few rounds of stockinette between the heel and the cuff, just because it gives that smoothness inside the shoe. That's it. It's that simple. You could use this technique for just about any sock pattern. Nine times out of ten, though, I'm using a super simple pattern, since socks are my #1 mindless knitting/movie theater knitting project. Here's what I do, more or less: Size 2 needles
The tubular bind off is about as fancy as I get with this pattern. I just like the way it looks, but you could use any stretchy bind off you like. I'm also quite fond of the ssk bind off. If this pattern is way too basic for you, there are some great simple sock recipes out there. I cut my sock-knitting teeth on the Yarn Harlot's pattern in Knitting Rules. Other folks swear by Wendy's Generic Toe-Up Sock pattern, which I have vague memories of maybe using once upon a time.Either way, I don't think you can go wrong. Happy Knitting! xx,
Pamela I've already apologized for being late (fashionably, I hope) to the party that is 2015 year-in-review blog posts. There's just so much that happened last year! One of my most exciting accomplishments in 2015 was that I started to design my own sweaters - two with my own handspun! And, while I'd only knit a sweater a year from 2012-2014, in 2015 I made two sweaters and a vest. Not too shabby. I still have a lot to learn about sweater design and fit, but I'm pretty exciting about what I have learned, and I'm loving that I'm taking a more active role in creating my own wardrobe.  Scrappy Sweater How I designed it: This sweater is a mishmash of Elizabeth Zimmerman sweaters: the classic EPS, the Brooks, with a v-neck and a shawl collar thrown in. I also designed the colorwork pattern. I wanted subtly shifting colors, without big motifs. What I learned:
This sweater quickly became one of my favorite sweaters - as soon as it was done (and cold enough), I've worn it almost every day. Rest assured, it does get washed, and while it's drying there is a serious hole in my wardrobe. As I mentioned above, I did learn that stranded colorwork stretches vertically when washed and blocked. Of course, I didn't learn that until after knitting the entire sweater, and ended up having to do some surgery on the sleeves to make them shorter. But I do love the long length of the overall sweater because.... I made it too big. This is a roomy sweater, even though (I think) I intended for the result to be more fitted. As I discovered later on in the year, I tend to overestimate what size I need (even after I've measured myself). The Key Takeaways:
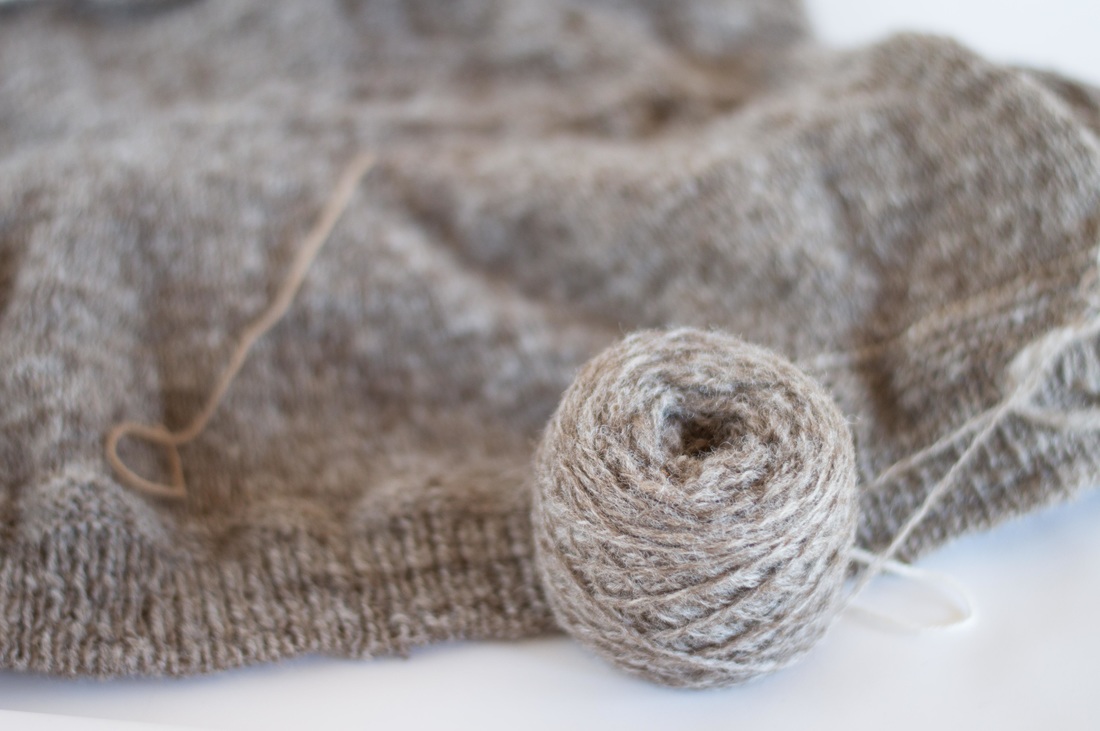
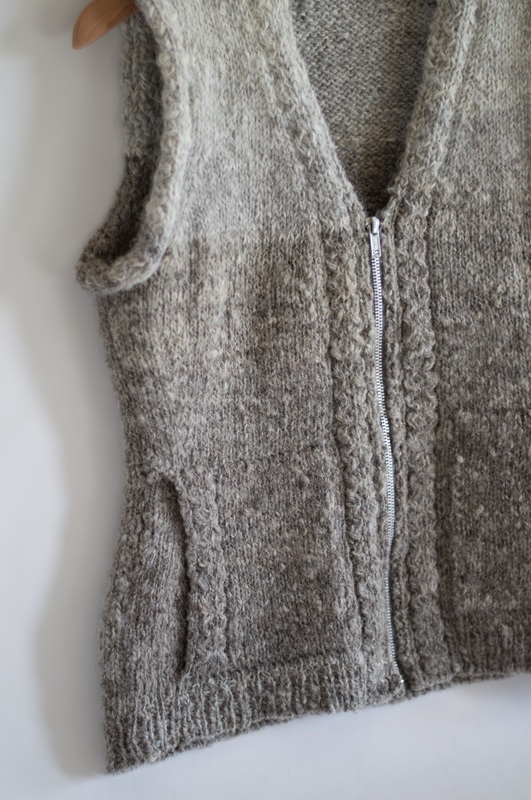 Jacob Vest How I designed it: I used an existing vest (like this one) for the initial measurements and worked from there. Added a cable detail at the edges. Pockets + zipper. What I learned:
This vest is extra special to me because it is made from local Jacob wool that I handspun myself. Because there wasn't enough of one color to make a whole vest, I decided to go for an ombre effect. The armholes are a little funky - they're a bit too deep, and at the same time they're too shallow for the edging I chose. I really didn't want to do a knitted-on edging, though that might have worked better. Overall, the coolest thing about this vest are the finishing touches - the zipper and the pockets. They make it a much more wearable item, especially the way I use this vest - as an in-between weathers piece, particularly when hiking. The Key Takeaways:
 Old Man Corriedale
How I designed it: This is a mashup of EPS, the measurements of the Jacob vest, and some other sweater design basics. It's not quite done yet, but since all the main pieces were made in 2015, I'm counting it! What I learned:
The body and sleeves of this sweater are made, and I'm almost done seaming the sleeves. The body was made in one piece, and that's where it's fitting a little large. Since it's destined to be a cardigan, I'm planning on lopping off a few inches at the center front before I pick up for the neck band. After that, all that's left are pockets! The Key Takeaways:
|
Archives
January 2024
Categories
All
|
 RSS Feed