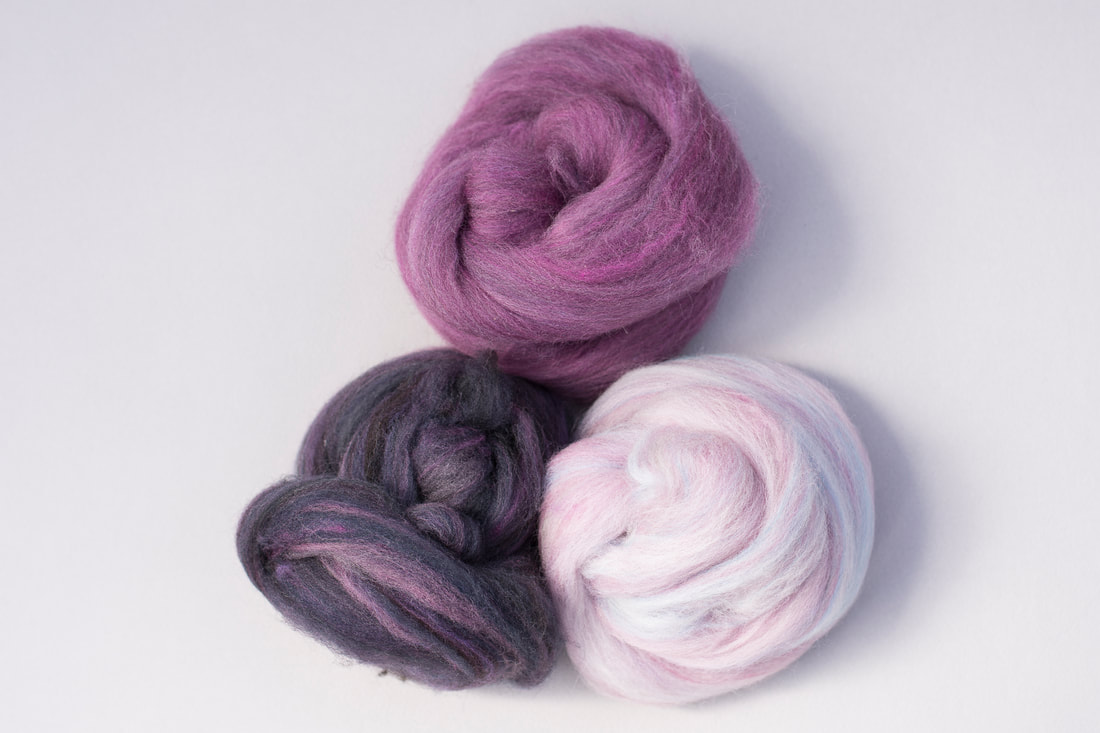
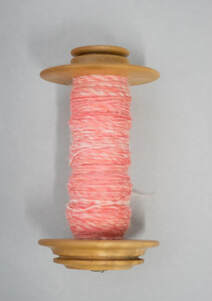
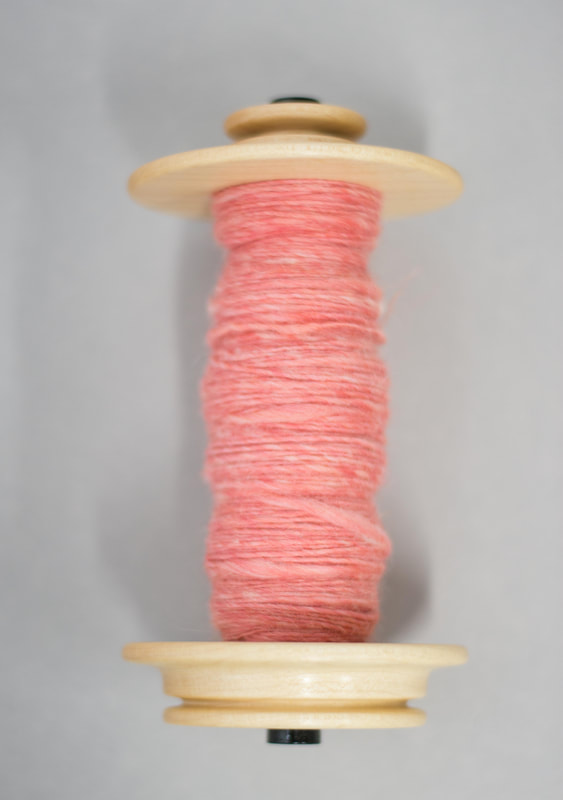
 Lately, I've been working on a project that makes use of a gradient. This is to be a sweater quantity with most of the yarn in the darkest color. I started with several piles of color - most of it the mauve/magenta color shown at the top of the first photo. Then I blended it into a gradient, adding darker and and darker values on one end, until I got to the almost-black-purple, and lighter and lighter values on the other end, until I got to the pale lilac-pink. 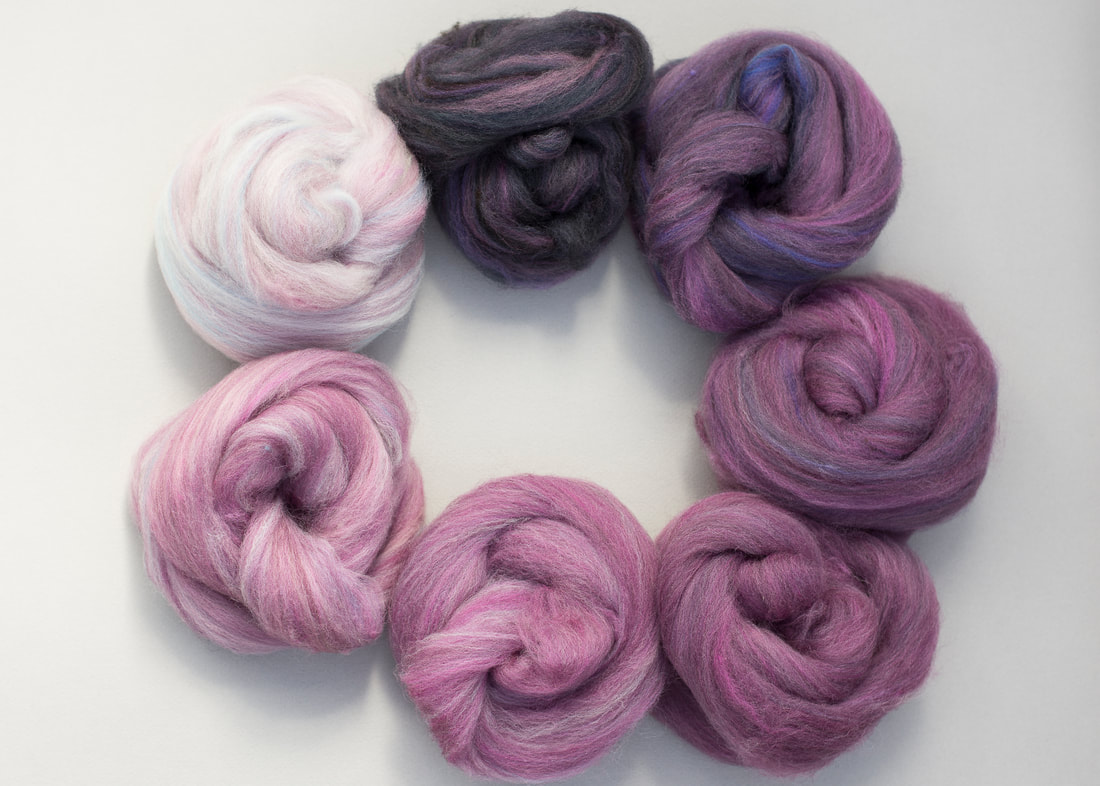 When I took the photo above, I realized there were a couple of places where I wanted to to smooth out the gradient, specifically at the lightest and darkest ends of the spectrum. So there are a couple more values in the gradient now! The fiber is mostly organic Polwarth, with a little bit of Merino and CVM in there too. I used the diz in the Spinner's Ultimate Multitool to pull the roving off the drum carder. Now I'm using the WPI gauge to make sure I spin to about 28 wraps per inch. I'm doing this as a short forward draw, which is a little bit outside my comfort zone, so I make sure to check pretty frequently! 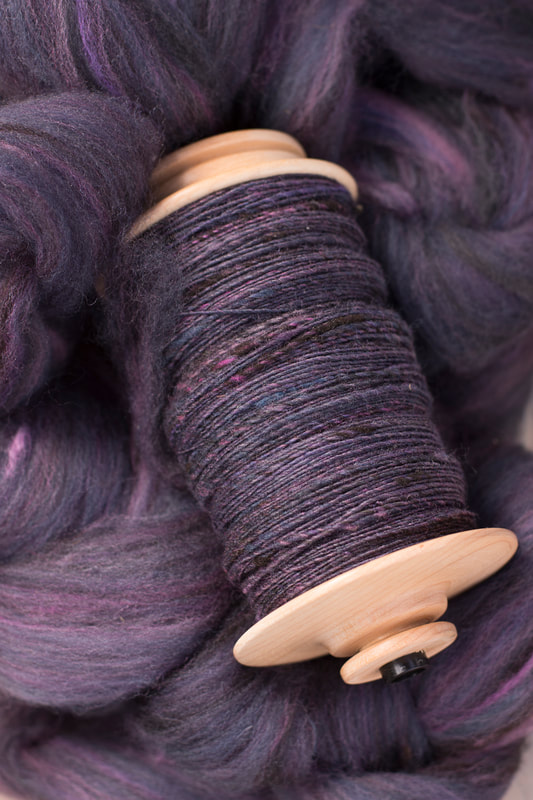 I'm starting with the darkest color. There's about 20 ounces of this, and then between 2-4 ounces of each of the other colors, so there should be plenty for the sweater I have in mind!
 Here are the results of the drum carding color blending experiment! From left to right:
All the fiber is Bluefaced Leicester, spun with a short forward draw. I was going for a little bit thicker than my "default" yarn, but I didn't try too hard to make sure that all the weights were the same, so there is definitely a little bit of variation in thicknesses and ply twist. One thing that I wasn't expecting is that because the first three didn't get put on the drum carder at all, they retained the alignment of industrial combed top, and therefore have more luster, while the ones that went through the drum carder look fluffier. It's a perfect example of the qualities that divide worsted and woolen yarns. Since I typically use 2-ply yarns, that's what I spun for, which technically adds another layer of color blending. Here are the singles on the bobbins for reference: 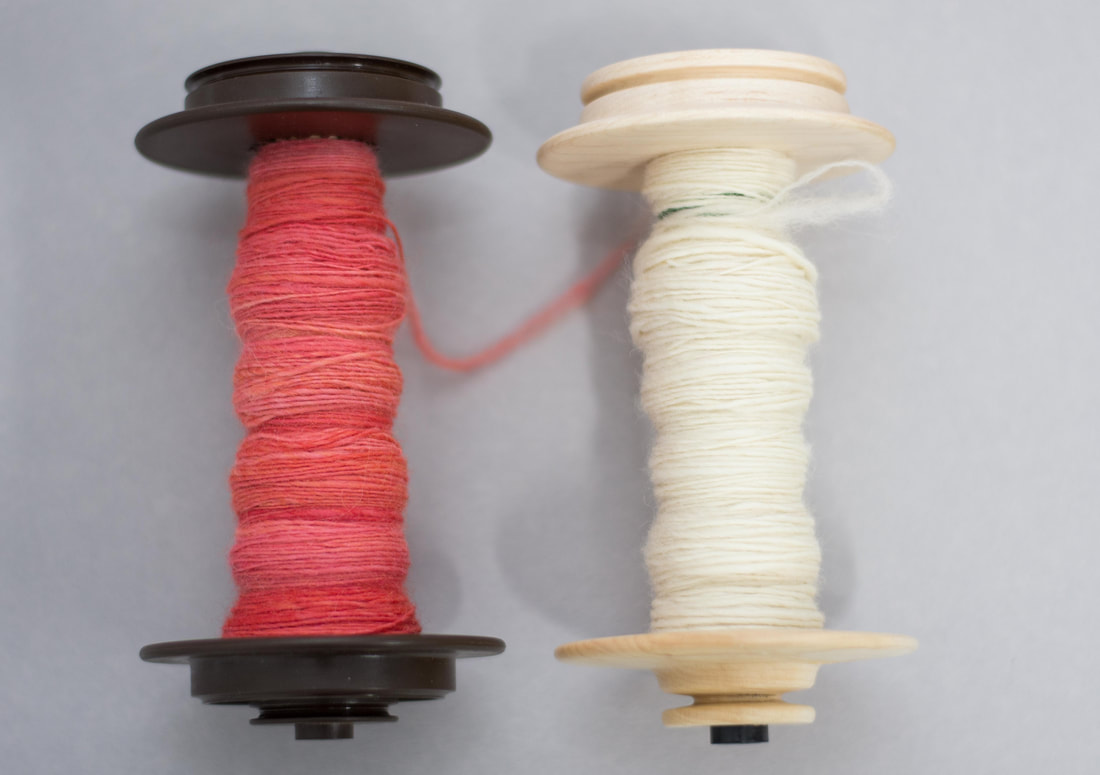
I do want to emphasize that none of these yarns is "right" or "wrong." It's all about what you want out of your yarn. I can think of times where I want lots of barberpoling and variegation, and other times when I would want a more even look. There is still a bit of variegation visible with the last yarn (three passes on the drum carder). It's a pleasant heathery look that I tend to love, but if I wanted complete blending, I might send the fiber through the drum carder for a fourth pass. Now on to the last step - knitting and weaving with the yarn to see how that affects the color blending! 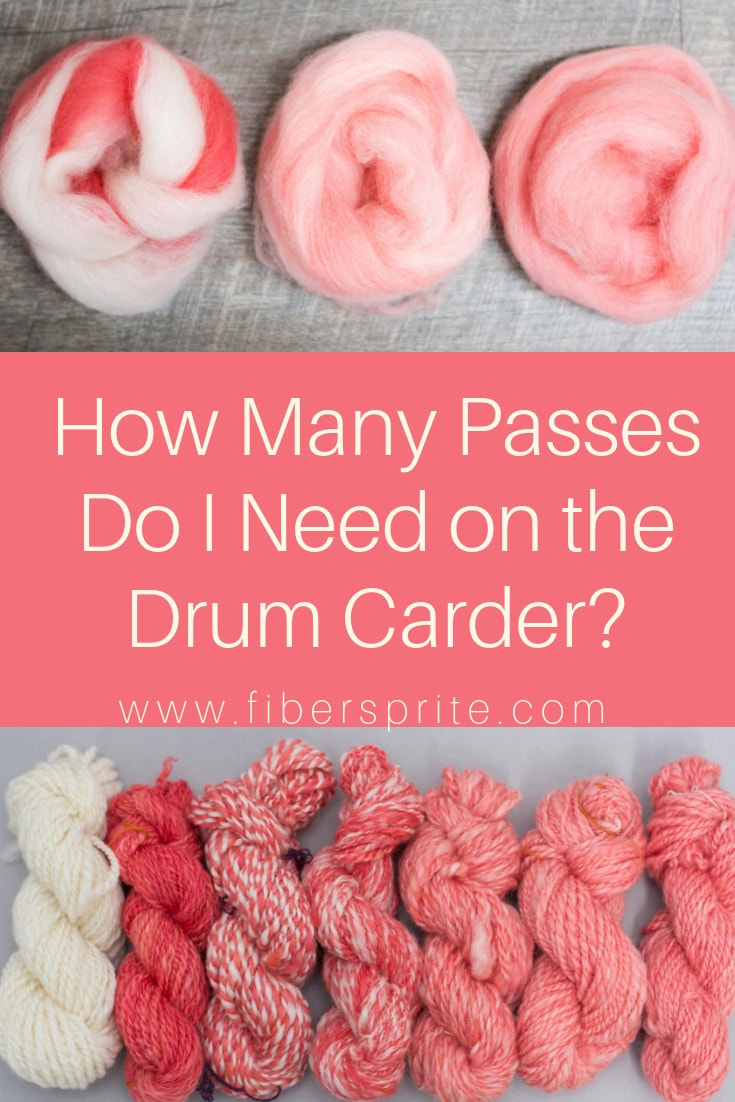 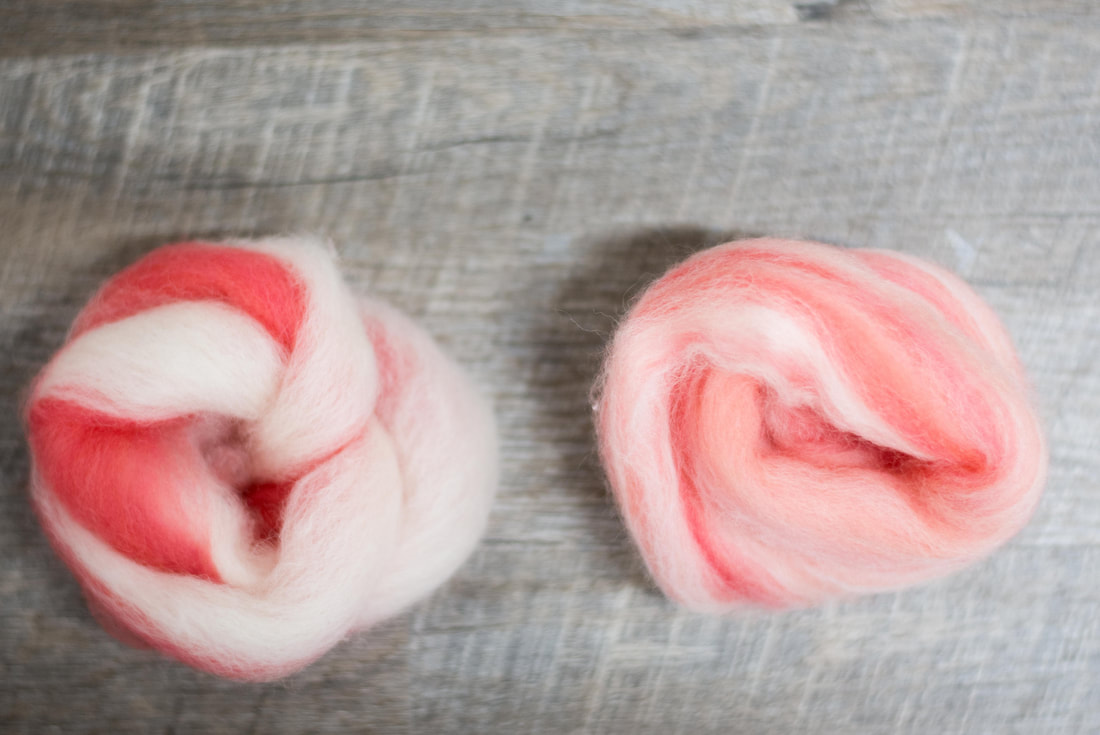 One of the things I love about using a drum carder to prepare fiber for spinning is how easy it is to blend different fibers and colors. When I first learned to use the drum carder, the "rule of thumb" was that you needed three passes on the drum carder. While I found this to be true when processing fleece, I often want to combine colors and textures from commercially prepared roving. Would I need to follow the three pass rule if the fiber has already been perfectly aligned? Generally, the more times you put fiber through the drum carder, the more thoroughly blended the fiber will be. Other things affect the blending too - like how many layers of color you use. In the photograph above, both balls of roving have been through the drum carder once - but how I fed the fiber in made a huge difference. On the left, each color was fed in as a single layer. On the right, I alternated colors frequently, which resulted in much more blending from the first pass. 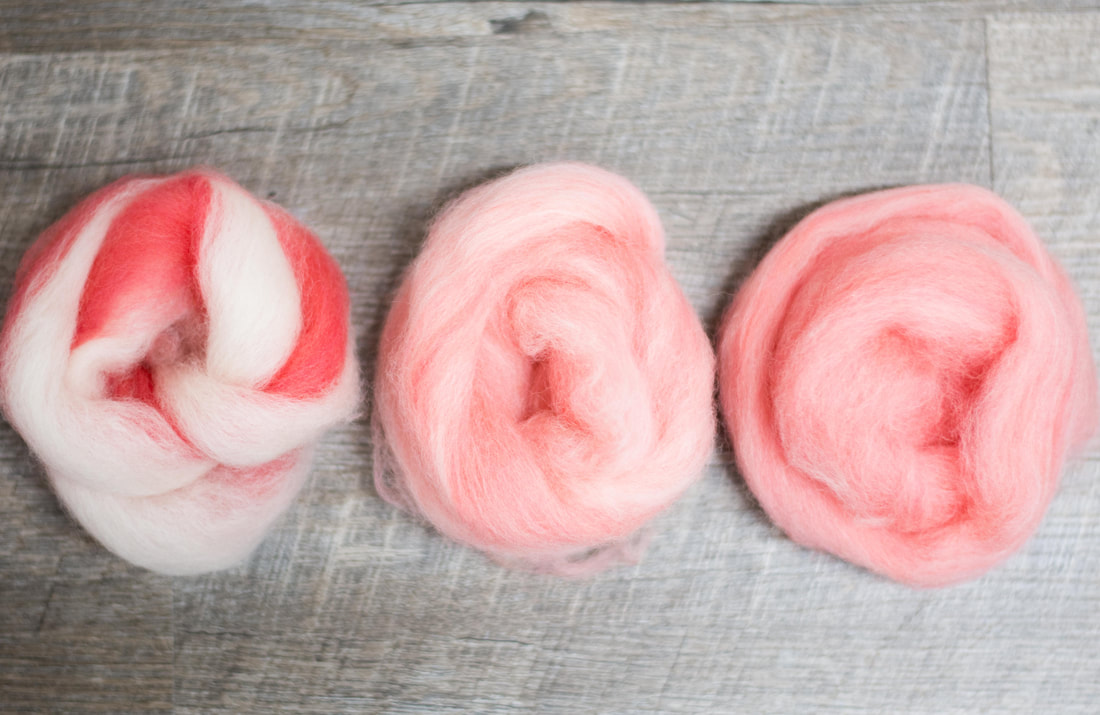 In the photograph above, you can see the progression of blending. On the left is some roving that has been through the drum carder once, with each color fed in as a single layer. In the middle, the roving has been through the drum carder twice, and on the right, the roving has been through the drum carder three times. In this experiment, there wasn't a huge difference for me between the fiber that had been through the drum carder two and three times.
So how many passes do you need on the drum carder? It all depends on what effect you're trying to achieve in your yarn. Stay tuned to see how each of these spins up! When it comes to yarn dyeing, there are lots of different techniques. One is "glazing," and it has nothing to do with doughnuts! Glazing is a technique where a dyer applies dye in very thin layers, so that the original color of the yarn is still visible underneath the glaze. It's a lot like the technique of glazing in watercolor painting, where a transparent wash of color is added on top of another color to create more complex fields of colors. There are several different ways to glaze yarn in dyeing, but they all boil down to using small amounts of dye, and making sure the dye strikes on the yarn very quickly. One way to do this is to pre-mordant the yarn, or to make sure there is plenty of acid in the dyebath before adding the dye. Some dyers use dry yarn or yarn that is only slightly damp. This is another way to make sure the dye stays on the outside of the yarn - since it will take some time for the moisture to penetrate to the core of the yarn, the outside of the yarn will be the first to get wet, and therefore the first to absorb the dye. One of the biggest challenges in glazing yarn is predicting what color your yarn will be when it comes out of the dyepot. There's definitely plenty of magic happening there, but a little understanding of color theory can go a long way in deciding what color of glaze you should use. There are plenty of in-depth books and tutorials about color theory, but there's no need to get bogged down in all of that if you don't want to. What you need to know is this:
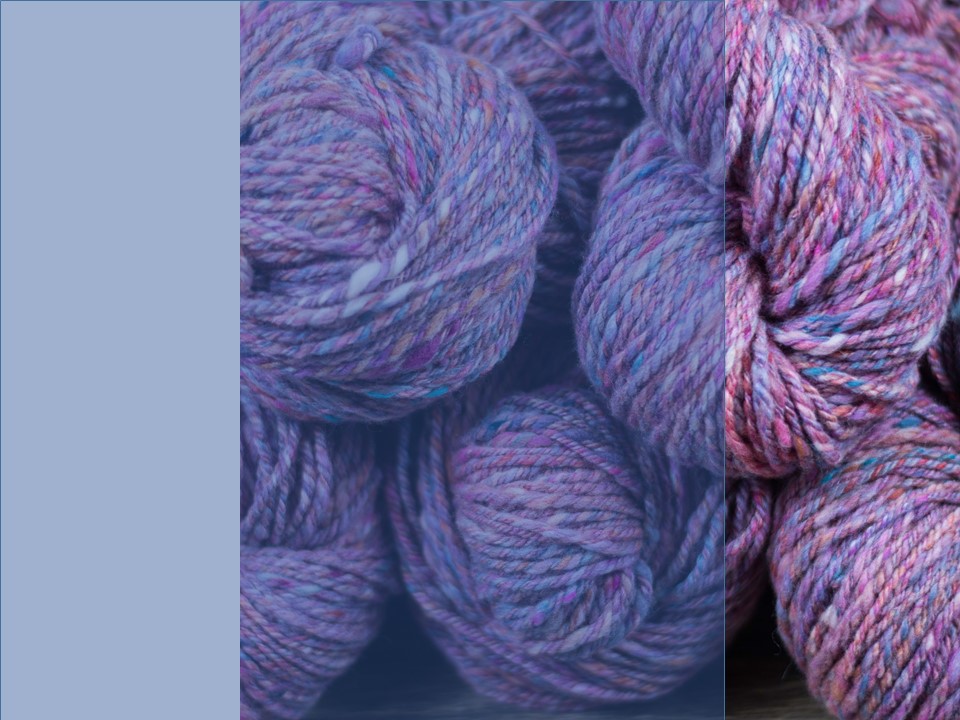
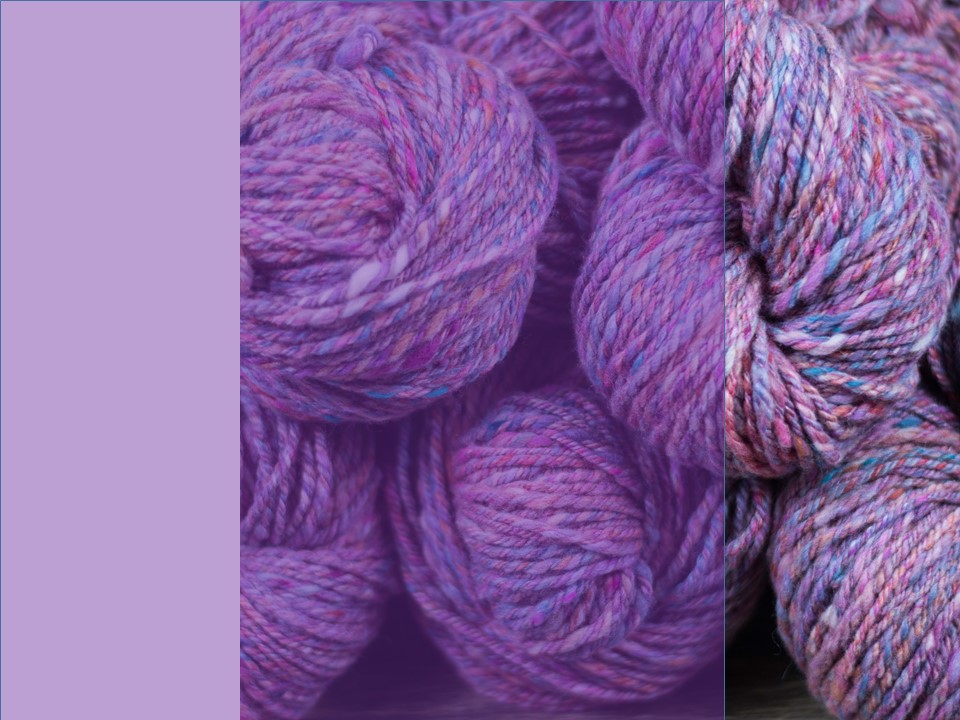
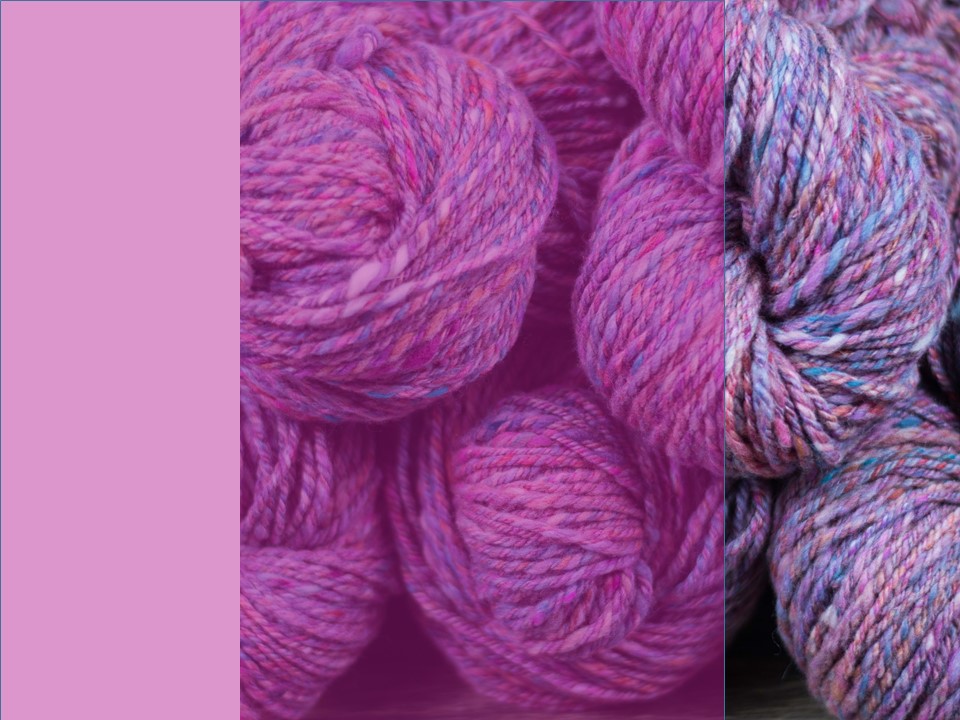
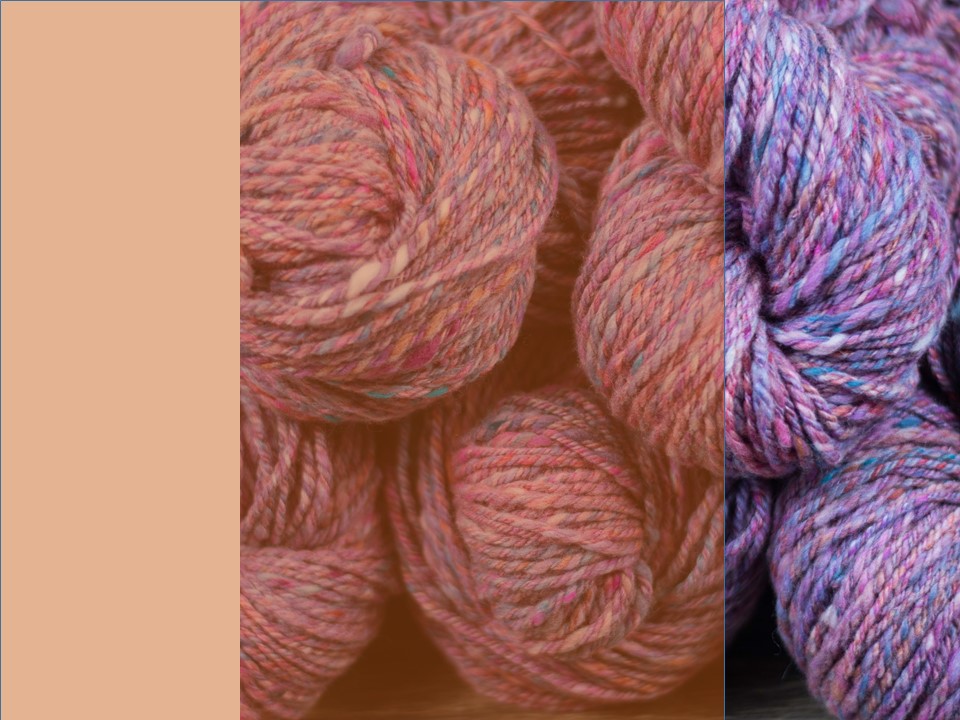
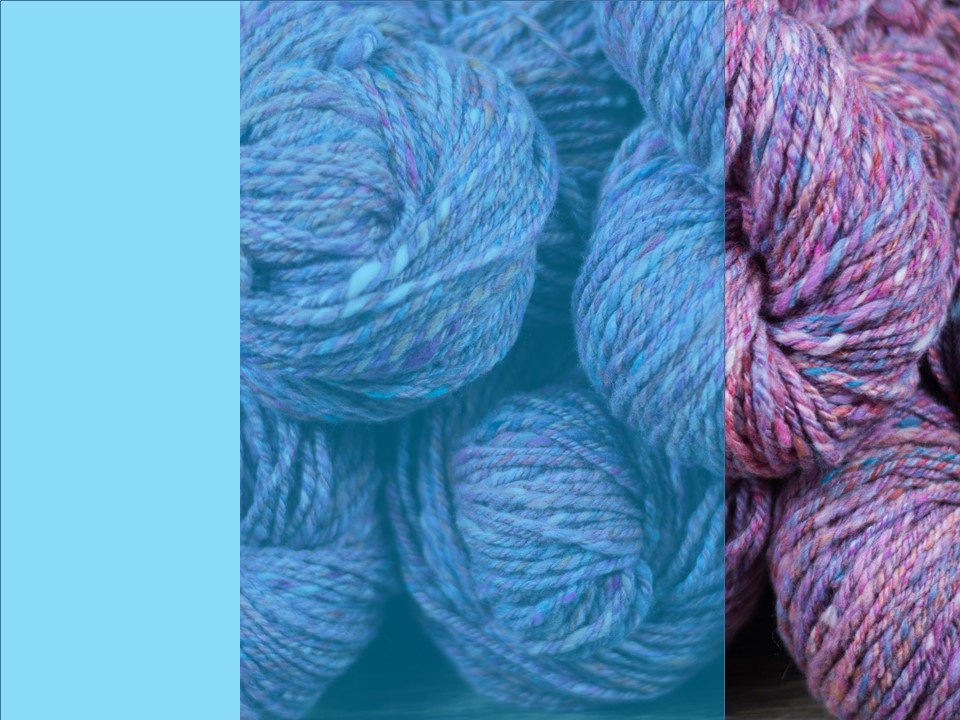
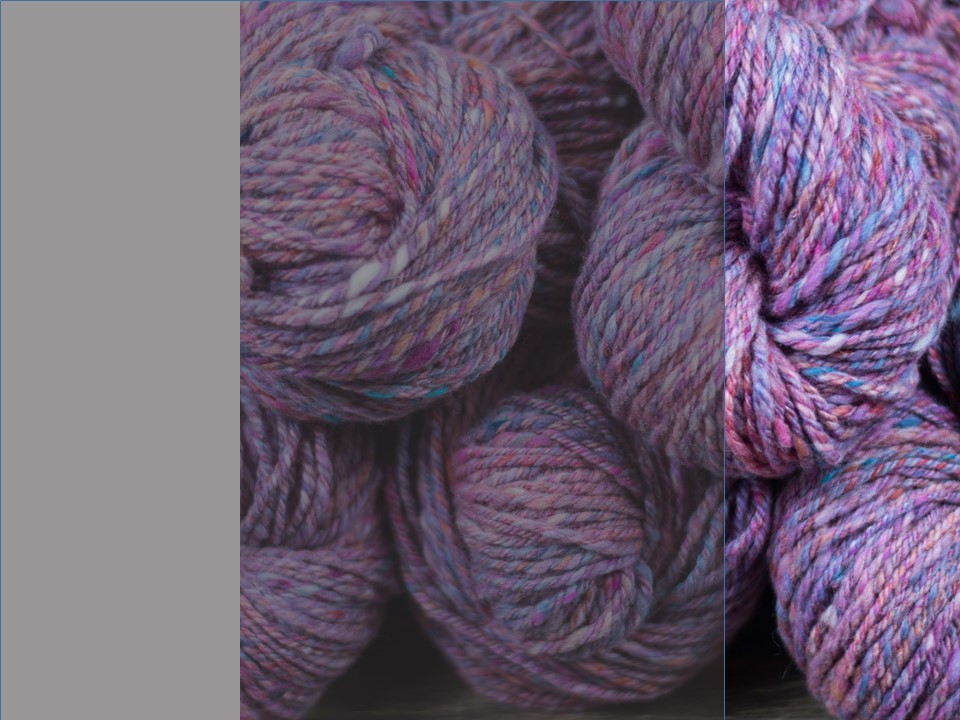
Knowing what color(s) you're starting with, and what color you're adding in your glaze will help you predict the outcome. But, naturally, I had to take it one step further. Sometimes it's helpful to see a prediction of what the glazed yarn might look like to help avoid disappointment. Here are six samples of predictions of what a recent handspun yarn might look like if I glazed it with blue, purple, pink, orange, turquoise, and black: To create these predictions, I used PowerPoint, though you could use any photo-editing tool that lets you make transparencies. I opened up a picture of my yarn, then drew a rectangle shape over part of the photo. I made sure the shape was selected, then edited it under "format shape." The "fill" section lets you choose the color and the transparency of that color. I usually set the transparency levels to about 50%, and then play around with all the colors I'm thinking of using. This isn't a perfect prediction - after all, the colors that show up on my monitor aren't going to be the same colors as my dyes, and it would be difficult to get the exact concentration right - but it does give me a good idea of what the glazes will look like, and helps me make more informed choices when I decide to overdye yarn. In this instance, I decided to overdye a leftover skein a blue-purple color. I intend to make a hat and maybe some mitts, and want them to coordinate with my Weekender sweater, but not be too matchy-matchy. Here's the overdyed skein: 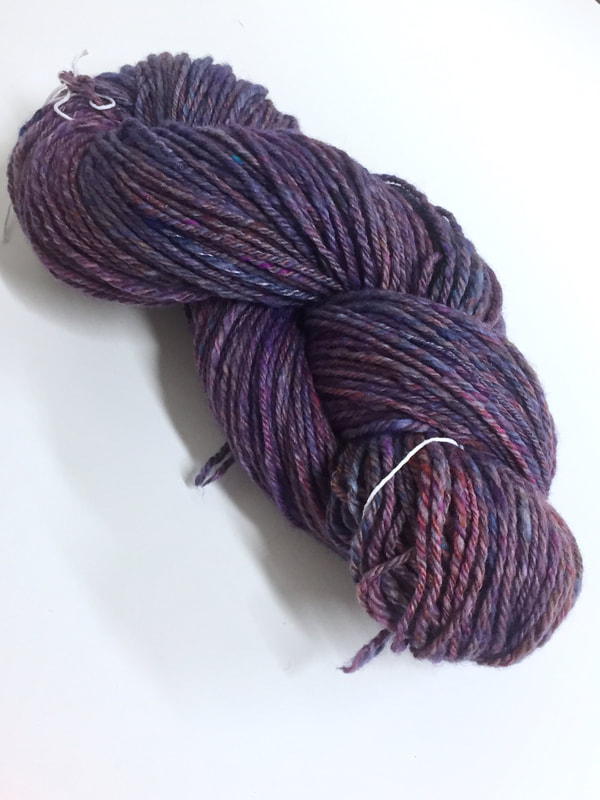 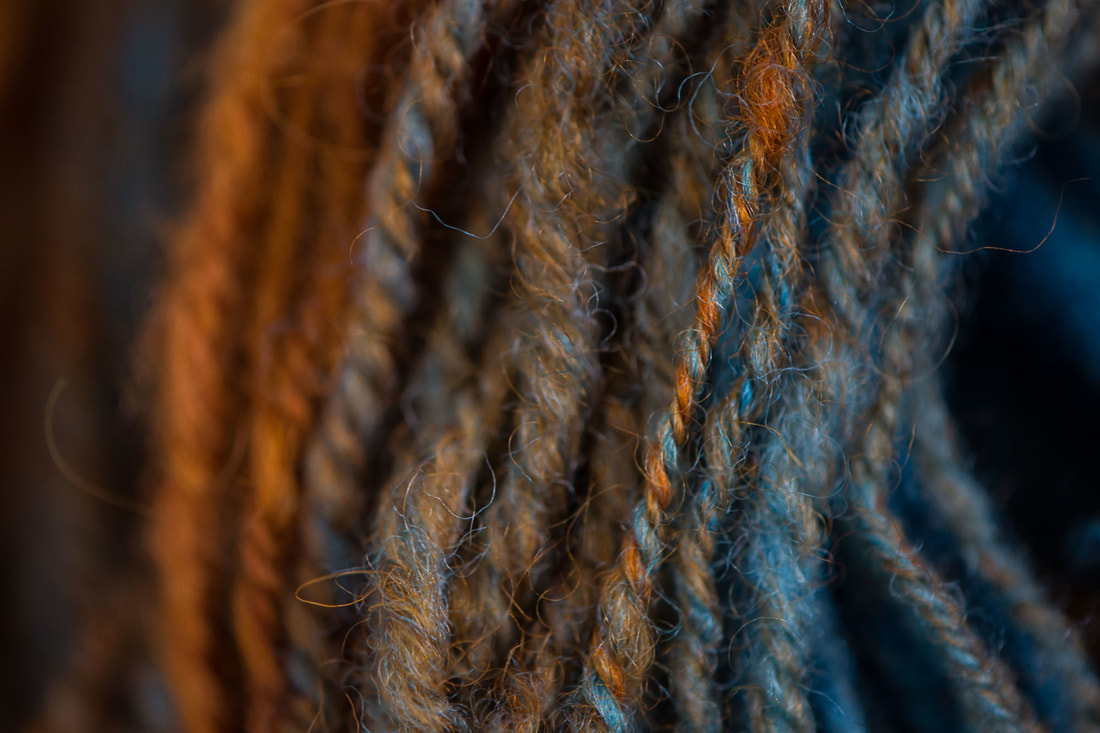 July means Tour de France. And while those batty bikers are spinning their wheels, silly spinners are spinning our wheels in Tour de Fleece - a loosely organized spinning challenge where the only ones we compete against are ourselves. We spin yarn while the bikers are riding, and rest while they rest. The idea is to challenge ourselves to something new, something big for us. This is the first year I've participated, and my challenge is play. To play with yarns textures, colors, and techniques I haven't tried before. To make lots of instant-gratification skeins (aka mini skeins) with no attachment to what they will become. A three-week workshop of fun, if you will. This week I spent some time playing in the mud. Not in the backyard, but on my spinning wheel. I was playing with making the color “mud” – on purpose. Lots of people will tell you that it’s a big no-no to mix complementary colors. They’ll tell you that mixing complementary colors will get you “mud,” and that you’ll be disappointed by it. But what “they” don’t tell you is that mud can be beautiful and fun. (Just ask any kid covered in real mud!) 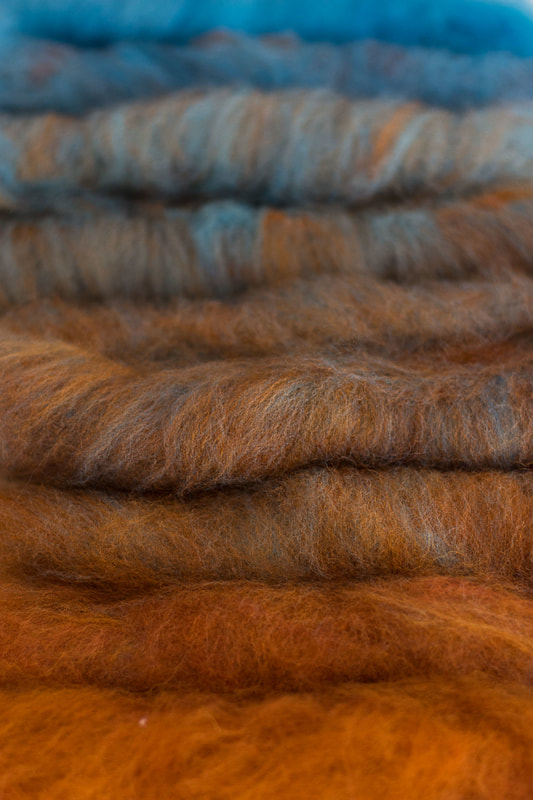 A crash course in color theory:
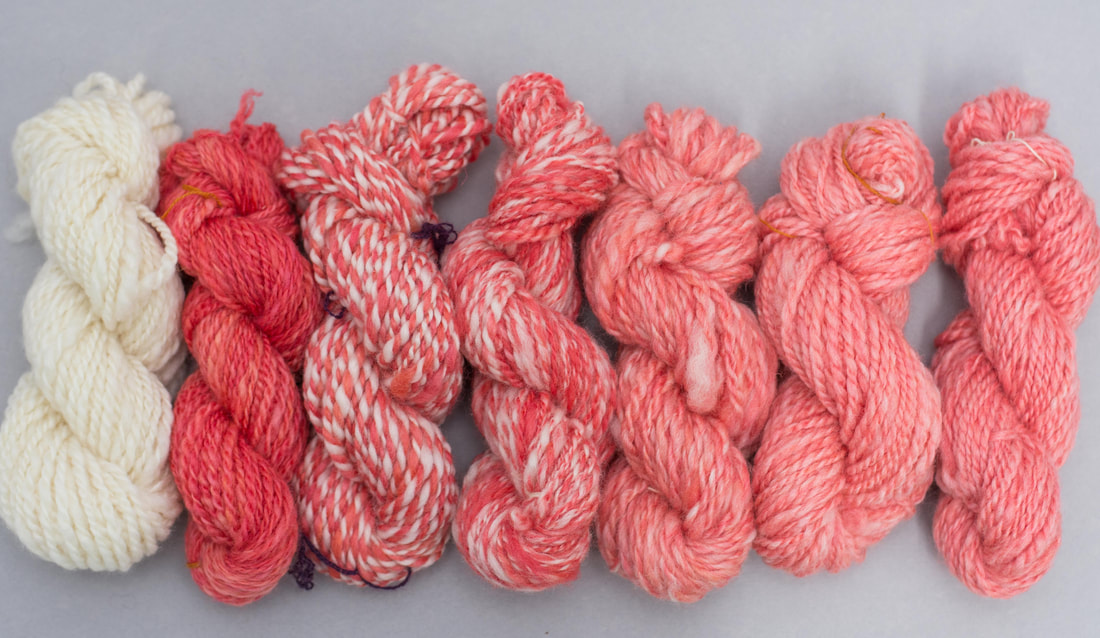
That's really all there is to it! The colors are often arranged in a color wheel, which is essentially the rainbow put into a circle: red, orange, yellow, blue, green, and purple. Colors opposite each other on the color wheel are considered complementary colors, or opposite from each other. These pairs are: red/green, blue/orange, and yellow/purple. The nifty thing about complementary colors is that each pair contains all three of the primary colors: one as pure primary color, and the other as a mix of the other two primary colors. For the complementary color pair of orange and blue, blue is the pure primary color, and orange is a mix of the primaries red and orange. The colors look satisfying together because they are opposites. They balance each other out. Think of college colors or sports teams – strong, opposite colors makes a strong and yet cohesive statement. The Denver Broncos, University of Virginia Cavaliers, and New England Patriots all use blue and orange as their team colors. I could go on, but I’d rather spend time playing with yarn than talking about sports. 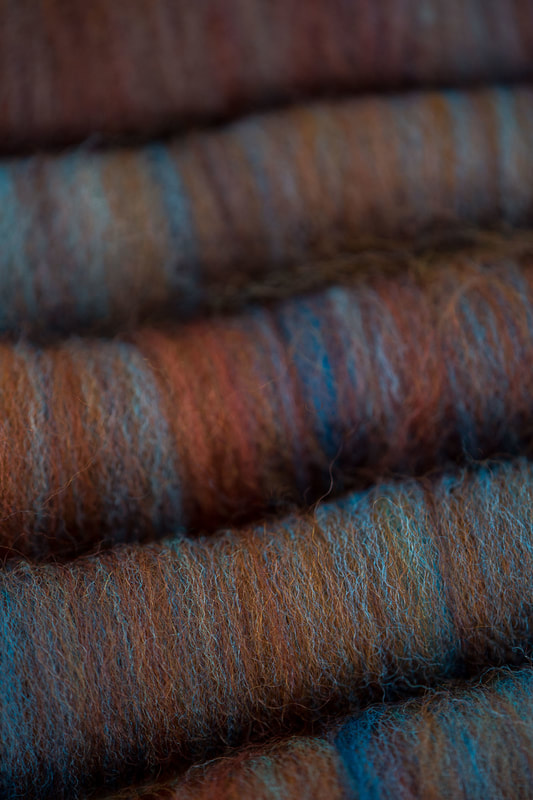 What happens when you mix complementary colors, like paint? As with all things, it depends. It depends on the intensity of the colors you mix, the proportions you mix them in, and how thoroughly you mix them. But the general consensus is that when you mix equal amounts and strengths of complementary colors, you’re likely to get “mud,” which is often brown, black, or a grayish color. Mud is the color that dashes the hopes of many an aspiring dyer or artist. They combine two colors that look great side-by-side and are disappointed the two didn’t combine to make something equally bright and exciting. Because all three primaries are represented in a mixture of complementary colors, they all tone each other down into a neutral. Sometimes this neutral is a dull, boring color. And sometimes it is rich, subtle, and intriguing. As someone who really loves neutral colors, this is a fun place to play. What happens when I add just a little bit of blue to orange? Or just a little bit of orange to blue? That’s what I was thinking when I decided to play in the mud this week. I wanted to show that mud isn’t something to fear. It’s something to understand, and use when it suits us. It’s something to help us achieve those subtle, complex colors that make people do a double take. What color is that? I love your colors! First, I started out with truly playing. I took a braid of blue that I dyed a while back. In truth, I really don’t love this color blue – it’s too flat, too plain, too cold. It’s not my color. For my orange, I took a braid of Lisa Souza’s BFL. My braid says the color is Deep Autumn, but it’s pretty darn close to her current color Aww-Tum. I randomly put the two onto my blending board as the spirit moved me, then made a handful of rolags and spun my heart out. I wound the singles into a center-pull ball and plied it into a two-ply from there. Here’s the result: 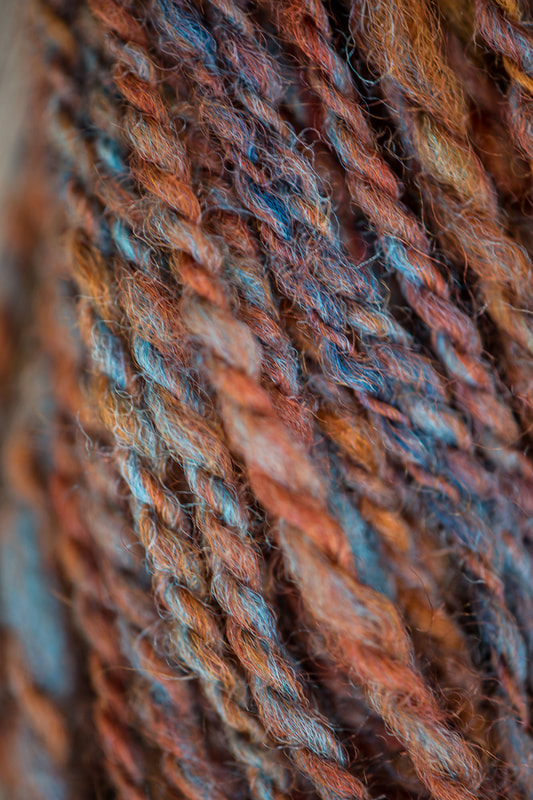 I had so much fun with that experiment, the next day I wanted to get a better handle on exactly what that color combination was that I loved so much. So this time, I had a little more of a controlled playtime. I wanted smallish samples, so I set my scale to grams. I made a gradient where each sample was 3-4 grams total. I started with 100% orange, then 90% orange/10% blue (this is my best guess, as that small of an amount didn’t register with my scale), 75% orange/25% blue, 67% orange/33% blue, 50% orange/50% blue, 33% orange/67% blue, 25% orange/75% blue, 10% orange/90% blue, and 100% blue. Maybe I got a little bit carried away! 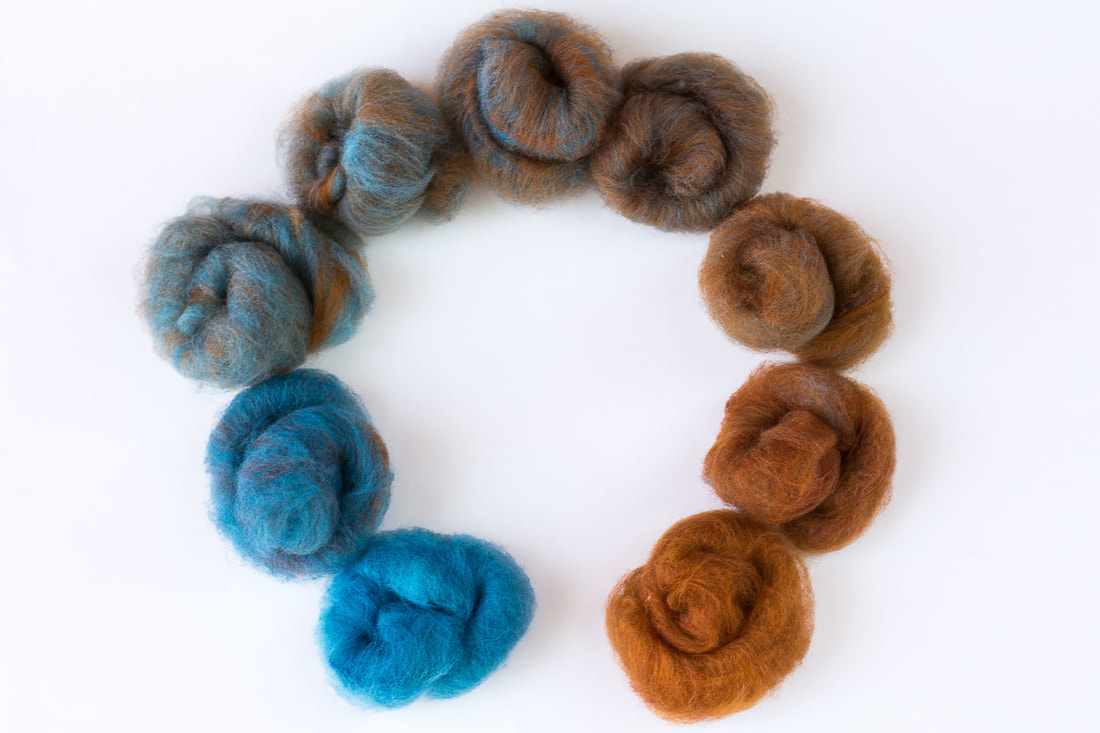 Then I set about carding the colors together so they were well blended. Each color blend got its own rolag, and I found that 4 grams of fiber is about the max my handcards can comfortably hold. After carding, it was time to spin. As Norman Kennedy says, “Good carding – your yarn’s half spun.” But my wheel was acting up – she’s a grouchy old lady who complains when her joints are out of whack. My fiber prep felt great and easy to spin, but treadling my wheel felt like walking through sand. (Or mud! 😊) It took me just about all of my spinning session to get the wheel adjusted just right to where I was actually moving. I spun the gradient in order, then chain plied to keep the color progression from orange to blue. I found that my favorite colors in this gradient are on the orange side, though the 75% blue/25% orange mixture reminds me of a lovely oxidized copper. 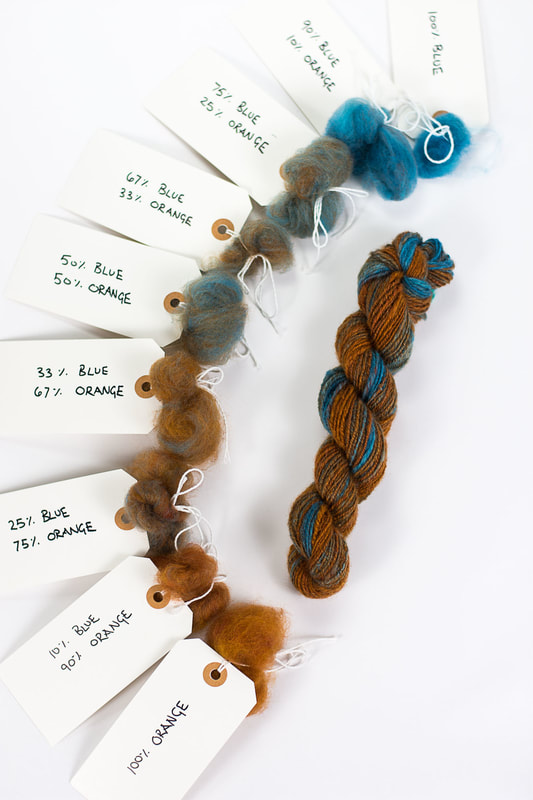 Using the technique of mixing mud on purpose can be really useful in colorwork of all kinds – you can create deep and intriguing colors that blend and speak with each other. And I'm not just talking about stranded colorwork in knitting - there are interesting places for this technique in anything that uses fiber and color, including weaving, crochet, rug hooking, rug punching, embroidery, you name it! If you’re using an orange and want a brown, why not make it yourself by blending your orange with a navy blue? You’ll get something that is much more related to your orange because it already contains your orange. You can create a whole range of complex and deep colors from just a basic few. (Though I'll never tell you that you shouldn't add a fun new color to your stash!) Making mud on purpose isn’t just fun – it gives you a huge range of complex colors to play with. All you need is a tiny understanding of color theory and practice, practice, practice! xx,
Pamela |
Archives
January 2024
Categories
All
|
 RSS Feed