|
My first adventure in "sweater surgery," as I like to call it, was with this sweater. I spent lots of time on it, and after steeking, found it was just too tight in the shoulders and sleeves. I was incredibly disappointed, and found myself at a standstill. I showed it to an experienced Fair Isle knitter, who gave me permission to chop it up and do whatever I wanted. She said, "Who says the sleeves have to match the body? Why NOT take it in a wild and crazy direction?" These are words I've lived by (at least in my sweater knitting) ever since.
With my most recent sweater, I had no way to truly check the fit until I'd steeked the armhole openings. I also was having so much fun knitting that I wanted to work "just one more repeat" when I should have stopped. The result was a sweater that had something goofy going on at the shoulders, and was way too long (but not long enough for a sweater dress!). It can be really frustrating to work so hard and have and end result that you're just not happy with. Luckily, knitting offers endless possibilities for repair and renovation. The first thing I did was work on the shoulders. I'd worked short rows for shoulder shaping, and maybe did a little too much shaping. I clipped one stitch, unraveled about four rows total, then grafted everything back together. Next, I clipped a single stitch where I wanted to shorten the sweater, then unpicked that row, placing the live stitches on a circular needle about 3 sizes smaller than what I used to knit the sweater. Since I wasn't going to knit from that, needle, it didn't affect gauge, and it was much easier to grab the stitches with the smaller needle. I could have knit new ribbing, but instead decided to graft the old ribbing back on, so that involved cutting off the extra and picking up the live stitches for the ribbing. Then a week's worth of grafting!
0 Comments
If you could totally avoid seaming your knits...would you? Seams actually do a lot for a sweater - in addition to adding structure, they have the benefit of keeping a sweater from stretching out. And for me, it's sometimes easier to work in small pieces, rather than turning a whole sweater around all the time! All you need to seam a sweater is a tapestry needle, either bent or straight. I also really love these little clips that hold the pieces together (you can also find them in the quilting aisle of the craft store). Scissors are always a must, and if you want to do a deeper dive into finishing techniques for knitwear, I highly recommend the book Finishing School by Deborah Newton. When it comes to seaming knits, mattress stitch is my favorite technique. In this video, I seam the sleeves into the armholes of my scrappy stranded colorwork sweater. But...I didn't stop there. I made a bunch of swatches to demonstrate different scenarios you might face in using mattress stitch. Note that these swatches are at a looser gauge than I'd normally knit. The goal was for the camera to be able to pick up the spaces between stitches and for you to be able to see exactly what I'm doing. First up - the basics. When everything lines up, and you're just sewing two pieces together. The biggest thing to remember when working mattress stitch is that you're working with the right side of the garment facing you. The seam will curl to the inside to give the garment structure. This is a little different than most sewing, which is done with the "wrong" or inside of the garment facing you. Next - seaming a cast-on or bound-off edge to a vertical edge (selvedge) of knitting. Followed by seaming cast-on to cast-on edges, or bound-off to bound-off, or cast-on to bound-off. What happens when things don't line up perfectly? That's the topic of the next video. And lastly, what happens when you're working at an angle because of shaping in the garment? This one does require a little bit of advance planning, but by now you should be an expert in mattress stitch!
I often end up doing things the hard way. Sometimes it's a learning experience, but sometimes it's really worth it. That's how I feel about the tubular bind-off. It's grafting (aka Kitchener stitch), and while some people might find it's tedious, I really love the look. So much that I was willing to do a total of three yards of it for several cardigans! If grafting's not for you, there are also several ways to use a tubular cast-on - with crochet stitches (too fiddly for me, but some people love it) or with a long-tail (the one I usually use). Because of the way my most recent sweater was constructed, all the ribbing was worked at the end, and that meant using the tubular bind-off. In this video, I walk you through the steps. Another critical finishing detail is picking up stitches for the neckline. Because knit stitches aren't square, you can't pick up stitches in a 1:1 ratio - doing that risks a baggy neckline!
To get the stitches to lay flat, I needed to use multiple ratios depending on where I was picking up - a horizontal edge, a vertical edge, and a curved edge. I walk you through all the ratios in the video. Continuing on my mission to take the "EEK" out of steeks, today we're talking about how to secure steeks. Technically, if you're using a sticky wool, like Shetland, you don't need to secure a steek before cutting. But that gives a lot of people the EEKs - so here are two ways to give yourself a little extra peace of mind before cutting your steeks. Securing Steeks with a Sewing MachineSecuring a steek with a sewing machine is the fastest and most secure way to do it. But it does require a little bit of extra care. It's helpful to use a walking foot if you have one, as this will help prevent stretching out the knit stitches. Be sure you are only sewing through one layer of fabric. This is especially important because of the way the stitches will settle into the knitting – it will be very difficult to see to remove if you do it wrong! Stitch slowly and carefully, being sure not to stretch your knit fabric. Doing so would distort the final garment permanently. Stitch one line of stitches on either side of the area to cut. Then you’re ready to cut the steek! Cut carefully with a pair of sharp scissors, right down the center of the steek stitches. Make sure you’re only cutting through one layer. Once the steek is cut, you’re all finished! You can enclose the cut edge if you want to, but those sewing machine stitches are really going to hold everything in place, so it’s not required. Securing Steeks with CrochetTo secure a steek with single crochet, you’ll crochet half of two stitches together, all the way along the area to be cut. The crochet stitches will lean to one side – you can use this to your advantage by making sure they roll outwards. This will leave you a clear path to cut. If you're planning on picking up stitches, you may want to go ahead and pick them up before cutting the steek. When you’re ready to cut the steek, cut carefully with a pair of sharp scissors, right down the center of the steek stitches. Make sure you’re only cutting through one layer. Once the steek is cut, you’re all finished! You can enclose the cut edge if you want to, but those crochet stitches are really going to hold everything in place, so it’s not required. Once you've cut your steeks, you'll just proceed with your pattern. For me, this included a fit check, followed by sewing the sleeves into the armholes.
After all the work of blending fiber, spinning yarn, and knitting a sweater...I decided to cut it apart! As a young knitter, I felt like cutting knits was about the worst thing you can do. After all, it's a decision you can't really reverse, and one of the things I like about knitting is the ability to unravel and re-knit to fix mistakes. But, that was before I understood the concept of steeks. Once I learned how they work, I started using them for almost everything! What is a Steek?The word “steek” comes from Middle English “steken,” meaning to shut, close, or fasten. But in knitting, it means the opposite, to cut open. A steek is a column of extra stitches connecting two pieces of knitted fabric, allowing the knitter to work more quickly in the round. The center steek stitch will later be cut. Most people get nervous about their knitting unraveling when they cut a steek. However, if you cut along a column of vertical stitches, you'll find that the knitting really doesn't want to unravel in that direction! Traditionally, steeks are used in stranded colorwork garments made with non-superwash wools - wools that will felt with wear. Over time, the cut edge felts together and is virtually indestructible. However, you can use this in other ways - like I did with this sweater. When Use a Steek?Use a steek when you want to knit in the round, but are working in a pattern that needs to have openings or separate pieces. This includes:
How to Set Up a SteekTo set up a steek, you'll add an odd number of stitches in the location you'll cut. Seven stitches seems to be the ideal number. These extra stitches won't add to the finished size of your garment - they'll get folded under during finishing. Most steeks are done in stranded colorwork, and the steek stiches alternate in some way. I prefer a column of stitches, as shown below, but some knitters like to do a checkerboard pattern. If I'm not working in stranded colorwork, I'll purl the stitch that needs to be cut so that it's easy to see. 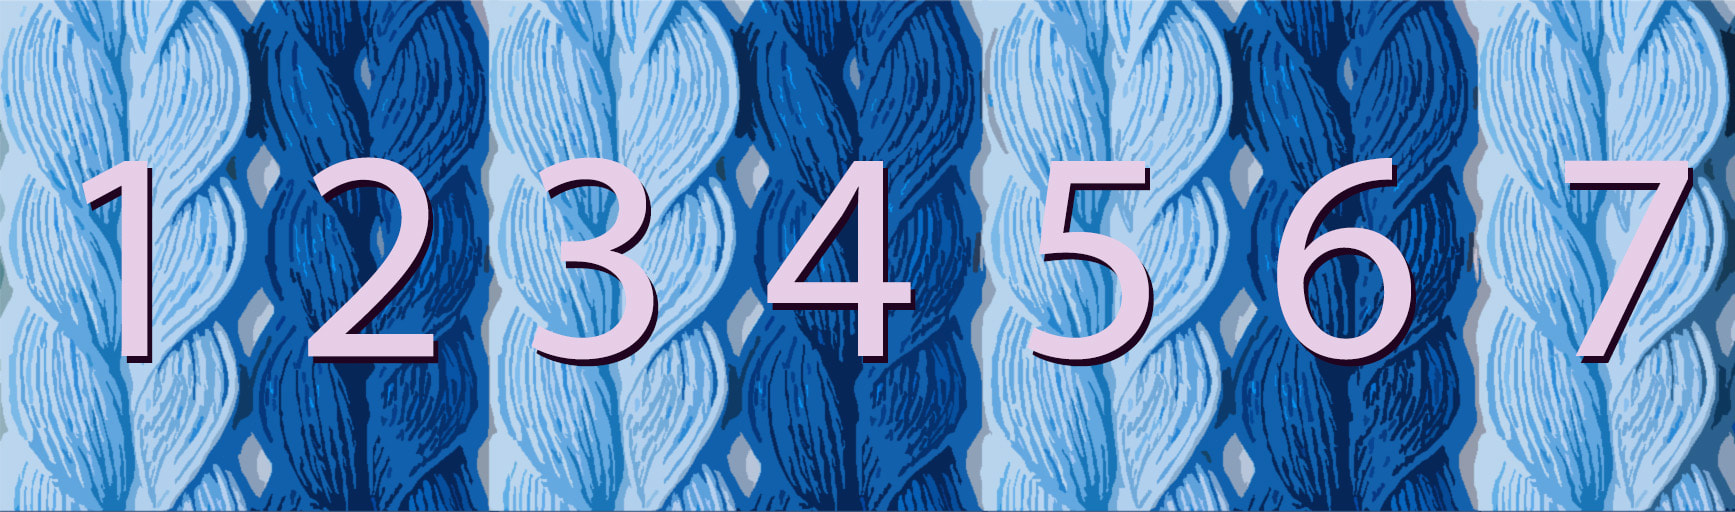 Ways to Reinforce a Steek
Cutting the SteekYou'll be cutting along the center stitch (stich #4 in the diagram above). Use a sharp pair of scissors, be sure to cut a straight line, and make sure you're cutting only one layer of fabric. That's all there is to it! Ways to Secure a Cut SteekMany people find they want to reinforce the cut edge in some way. Here are the ways I've used over the years.
|
Archives
January 2024
Categories
All
|
 RSS Feed