|
My test warp is off my Cricket Quartet, my studio finally has great lighting, so now it's time to get weaving! Most weaving videos on the internet focus on the actual weaving process, and there are plenty of those coming up. Today's videos focus more on the design process. This is the process I learned when I first started weaving, and it's let me mostly design all my own projects without having to rely on printed patterns. I do use a few books for "design recipes," though! Here are a few of my favorites for 4-shaft looms:
In this first video, I walk through the math I use to make sure I have enough yarn. For this project, I'm using a 3-ply linen from Weaver House, sett at 20 ends per inch. My pattern has 268 ends, which lets me use the whole width of the Cricket Quartet. As promised in the video, here are the free downloads:
In this second video, I walk through my process designing the warp in WeaveIt. This isn't a full tutorial of WeaveIt, but if you need one of those, Sally has created plenty of helpful tutorials on her channel. If you're interested in using or modifying this pattern for your own use, there are free downloads below - one is to the WIF file, and the other is a printable PDF. 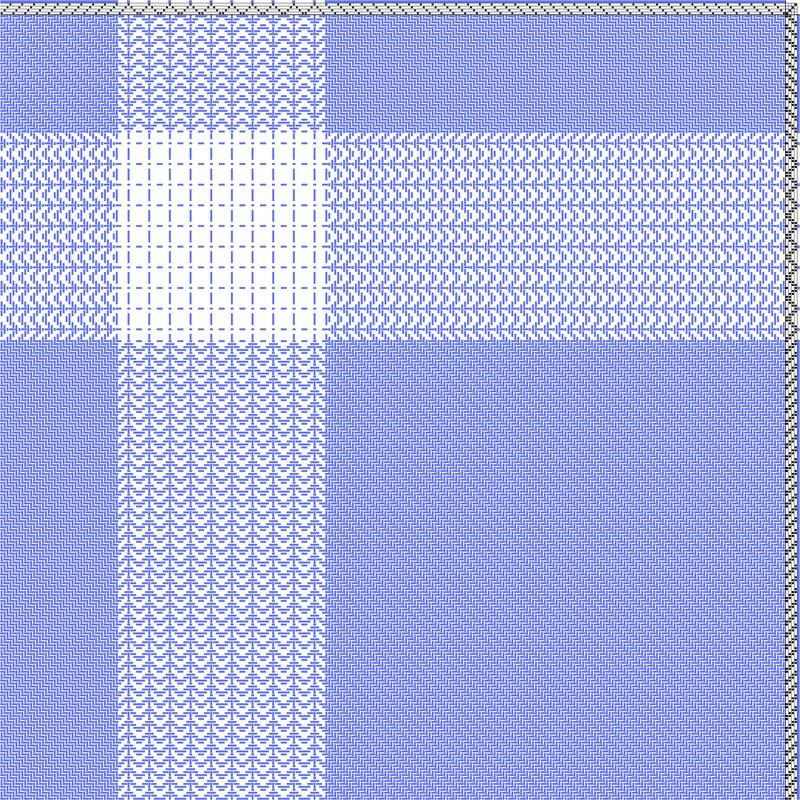
Now it's time to get warping! I'll be back with tips on how to use a warping board, check out what happened when I asked an AI chatbot how to do it.
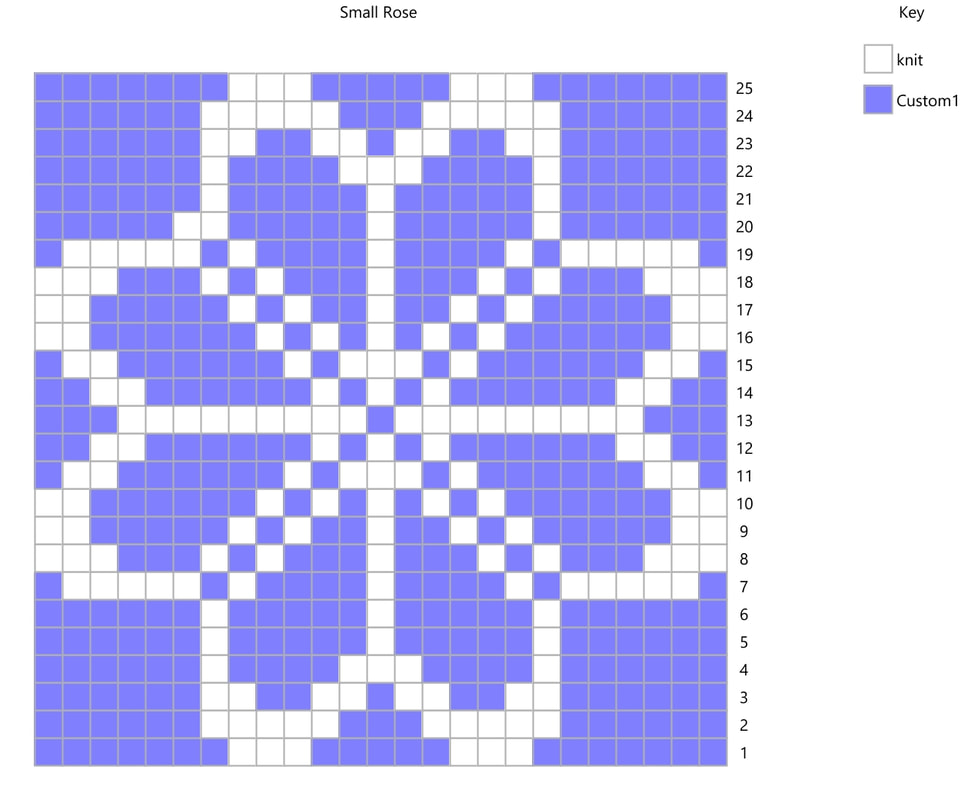
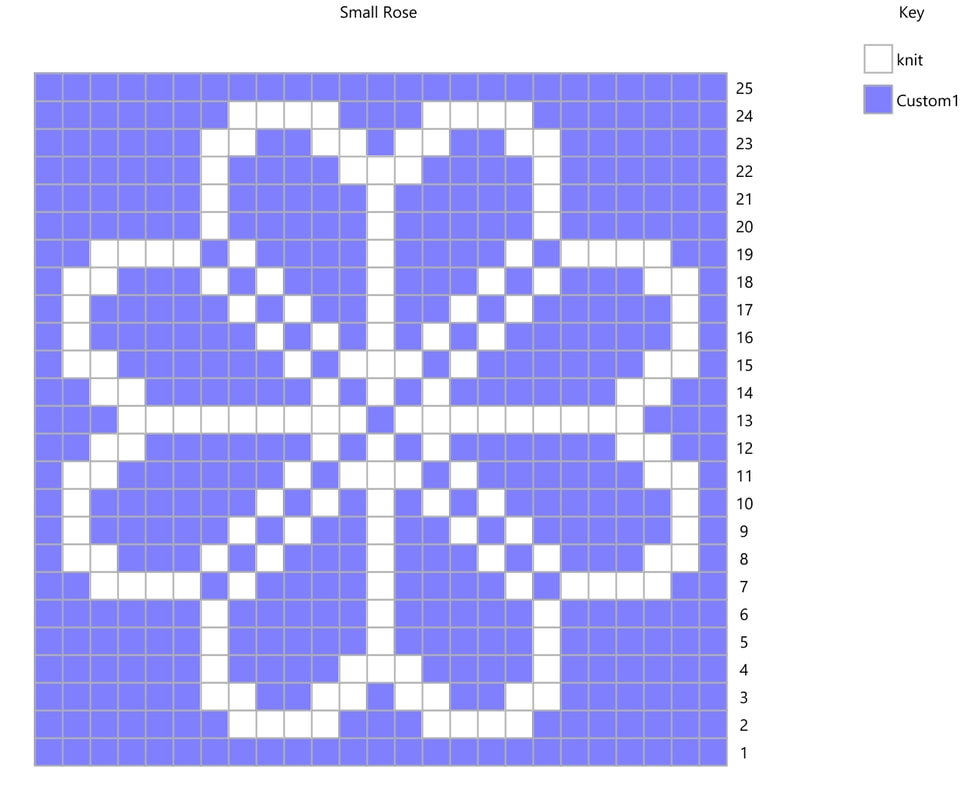
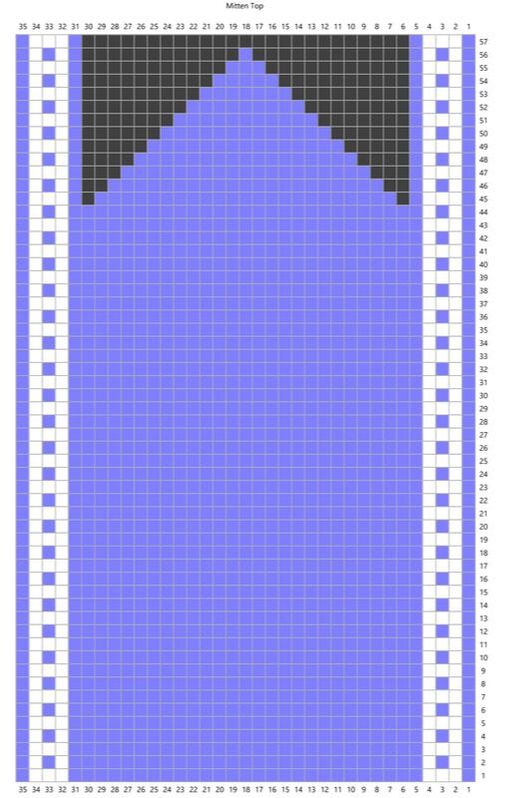 In my last post, I shared how to modify the size of a stranded colorwork motif. In this post, I'll share how to use it in a repeat with a simple mitten design. In this pattern, the dark gray/black square represent no stitch. There are decreases in the pattern to form the mitten top which are not noted in the chart - this is to give clarity in the colors. The set of five stitches at the left and right edges of the pattern form a border at the sides of the hand. They do not change, but as the decreases shape the top of the hand, they will slope inward. 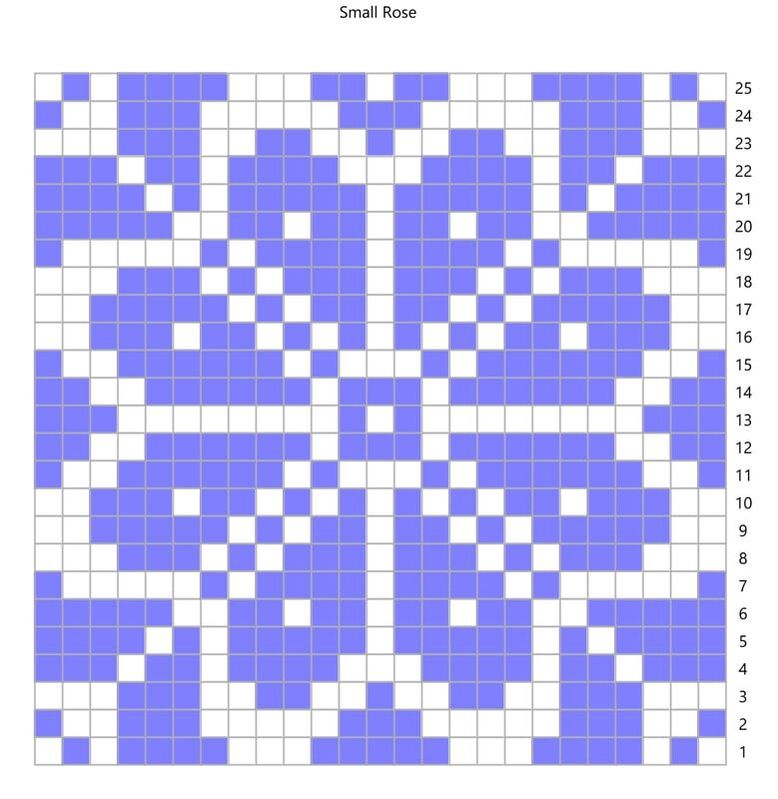 The first step in setting up a pattern repeat is to simply repeat the pattern. Here, I'm using a variation on the pattern I shared in my last post. 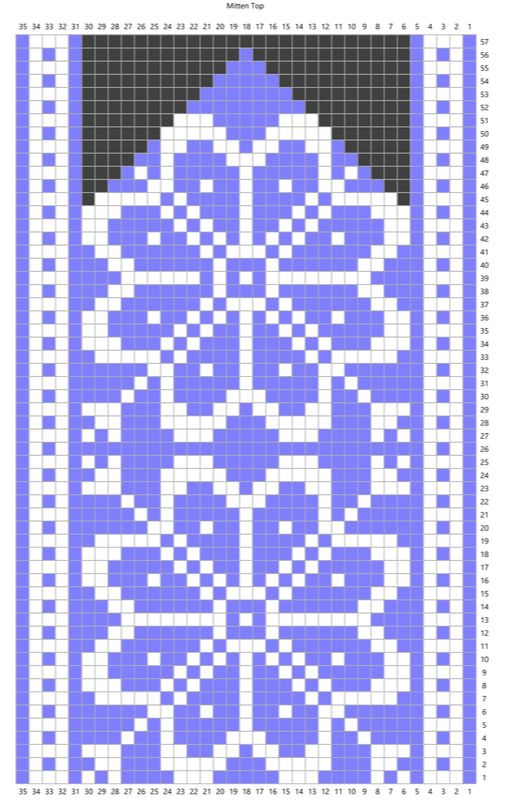 Stacking the pattern on top of itself, we get two repeats of the rose. The outer corners at the top of the rose are cut off. This is fine, as long as the rose itself fits fully into the pattern. (If it didn't we'd need to go back and adjust.) It seems like the white of the rose petals falls off the edge of the pattern. However, because the borders are edged in the background color, there will be a purple border around them. 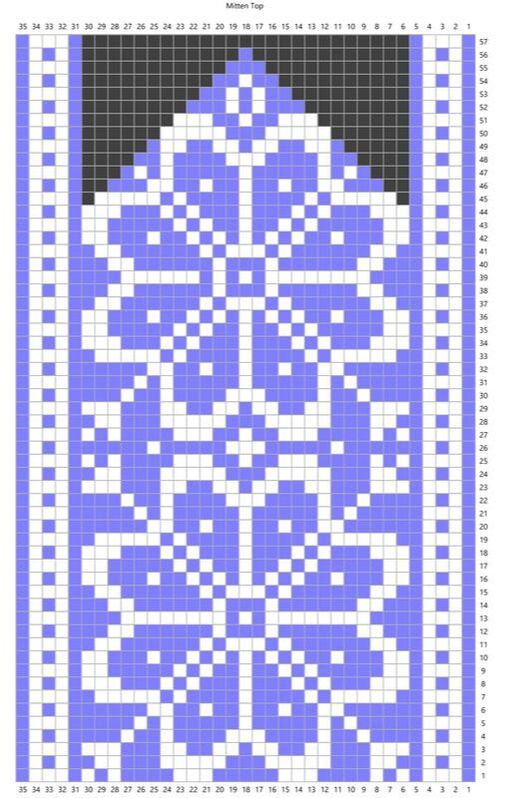 Usually, when you repeat a large motif, there are places that end up with very long floats. The next step is to create new, smaller motifs to prevent these floats. Here, I've added a small cross and two dots between the motifs to prevent long floats. At the top, there is a lozenge shape to fill in the space. Your options at this step are limited only by the number of stitches you have and your imagination. And that's really all there is to it!  Have you ever fallen in love with a stitch pattern, but it's not quite the right size? In this post, I shared how to resize a cable pattern. Today, I'll share one approach to modifying the size and design of a stranded colorwork pattern. This is a great technique to use if you're using handspun yarn that doesn't exactly match the gauge of a pattern, or if you need to substitute yarn. In this example, I'm sizing down, but it would be just as easy to make the stitch pattern larger with these same ideas. 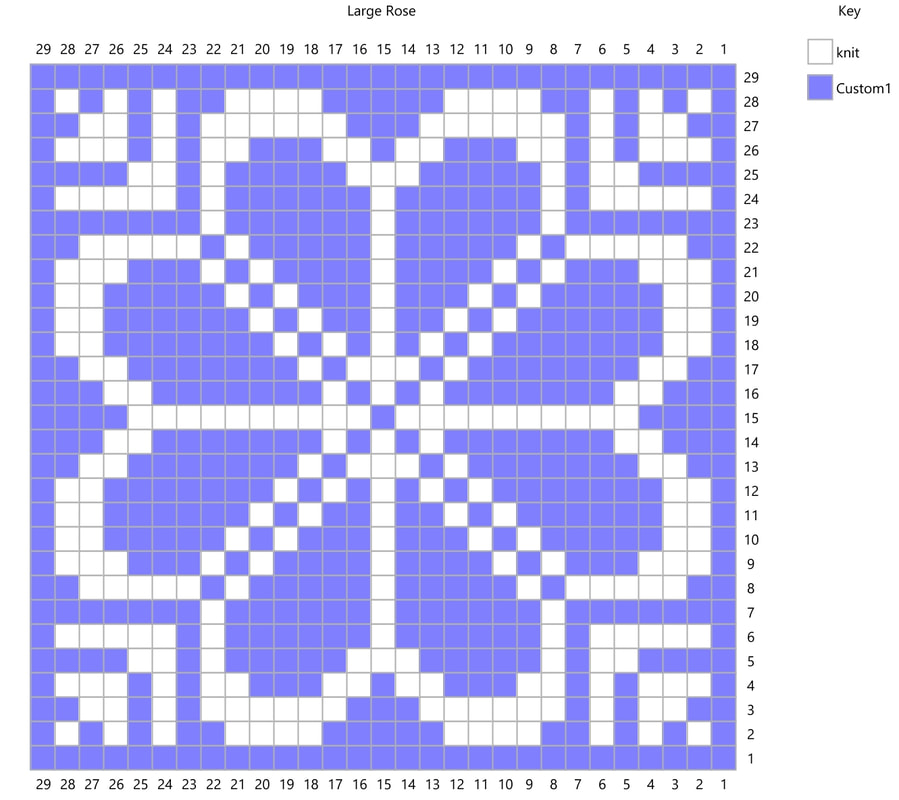 In this example, I started with a 29-stitch-square repeat of a traditional Norwegian 8-petal rose. I liked this pattern, but needed a stitch pattern that would fit into a 25-stitch square. The easiest, and most obvious choice in my situation was to remove the border of solid color stitches, which took me down to 27 stitches. I still needed to reduce 2 stitches on each side, and chose to start with the petals. 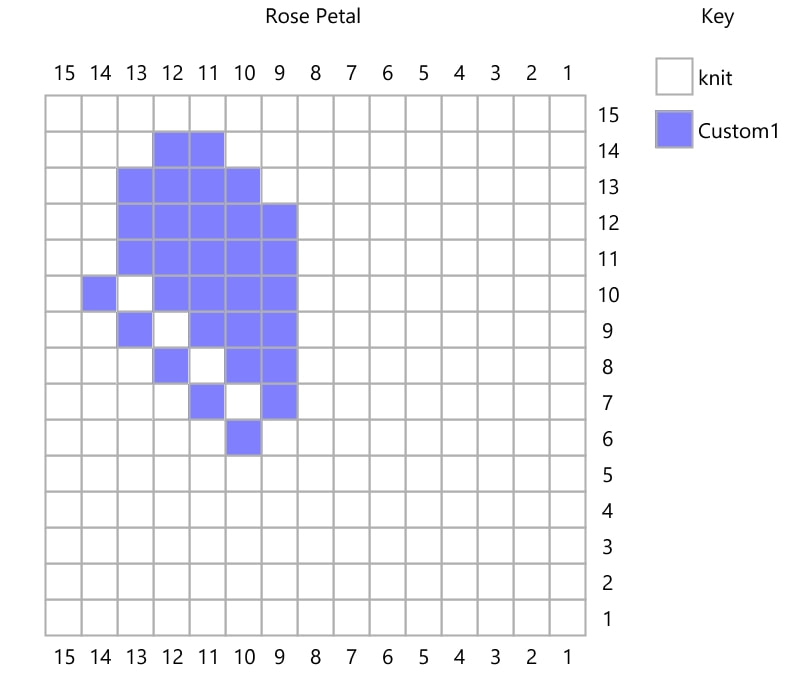 By drawing a petal that has one less row and one less column, I've reduced the size of the pattern. Expanded over the entire repeat, this will get me to the right number of rows and stitches.
At this point, it would be totally fine to draw out the rest of the pattern by hand. However, a little bit of copy/paste/rotate action saves a lot of work. This also helps to make sure that any inconsistencies get repeated (which is how patterns are made).
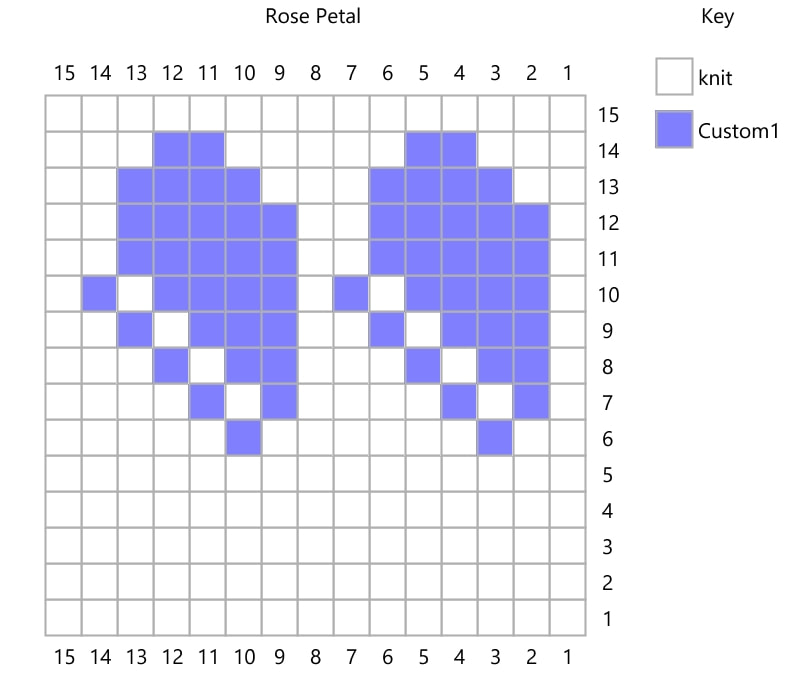
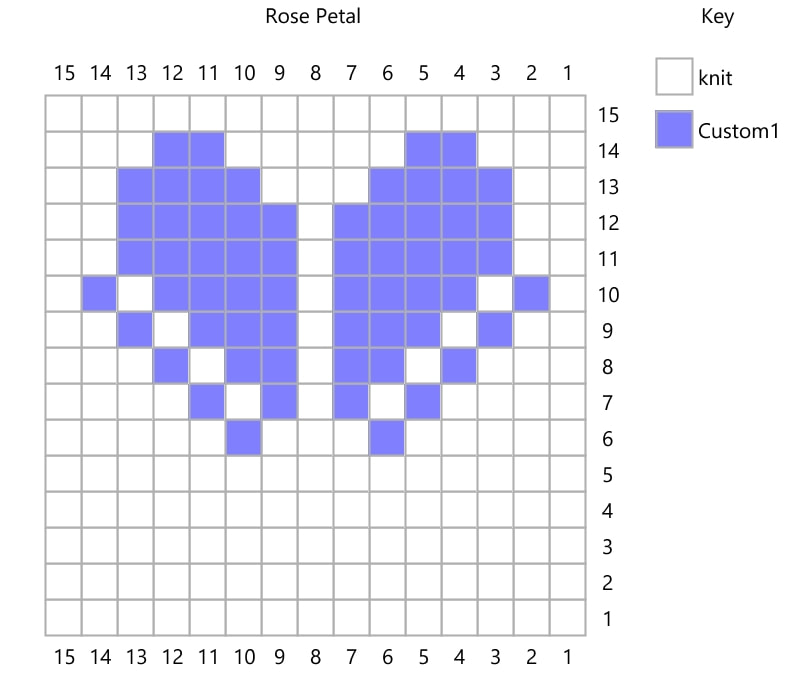
The next step is to fill in the outer petals. You'll notice that in the image on the left, the petals touch the outer edges. This isn't a problem if they touch a border that is the same color as the background. However, to make sure the pattern is clear, you can make the outer petals thinner, as in the image on the right. 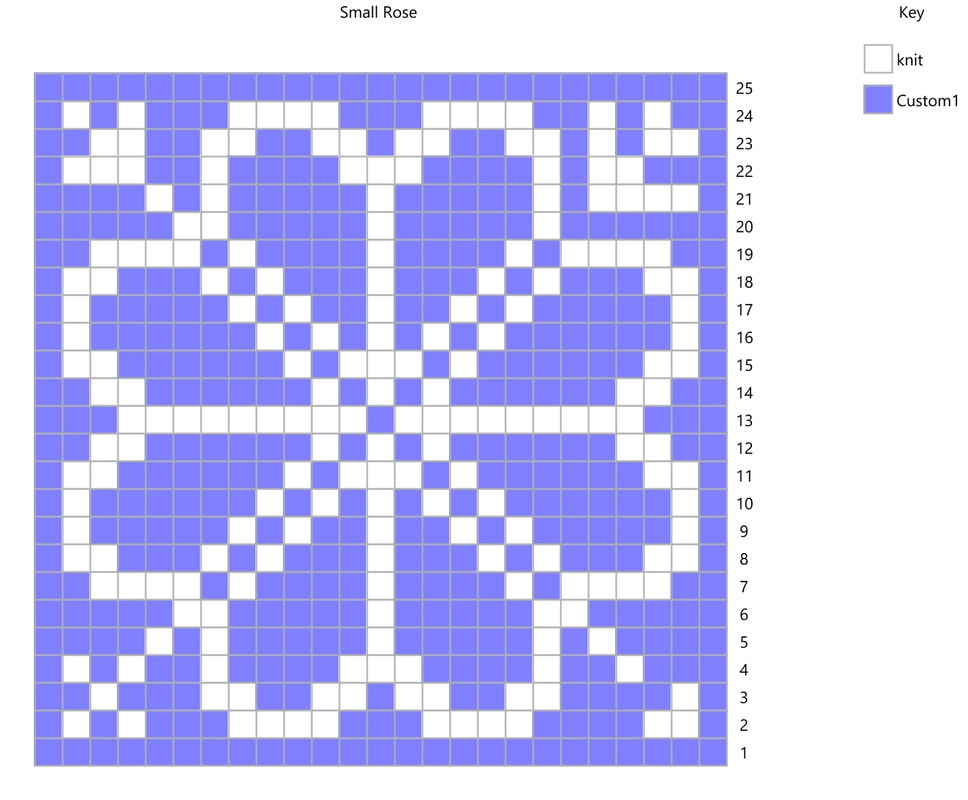 Now it's time to fill in the corner patterns. Because there are fewer stitches to work with than in the original, this pattern must also be adjusted. There are lots of options - I've placed a different pattern in each corner to show the possibilities. Normally you will choose one pattern and repeat it in each corner. At this point, the pattern is fully resized and you're free to use it in your pattern, or you can continue to play around with modifications. 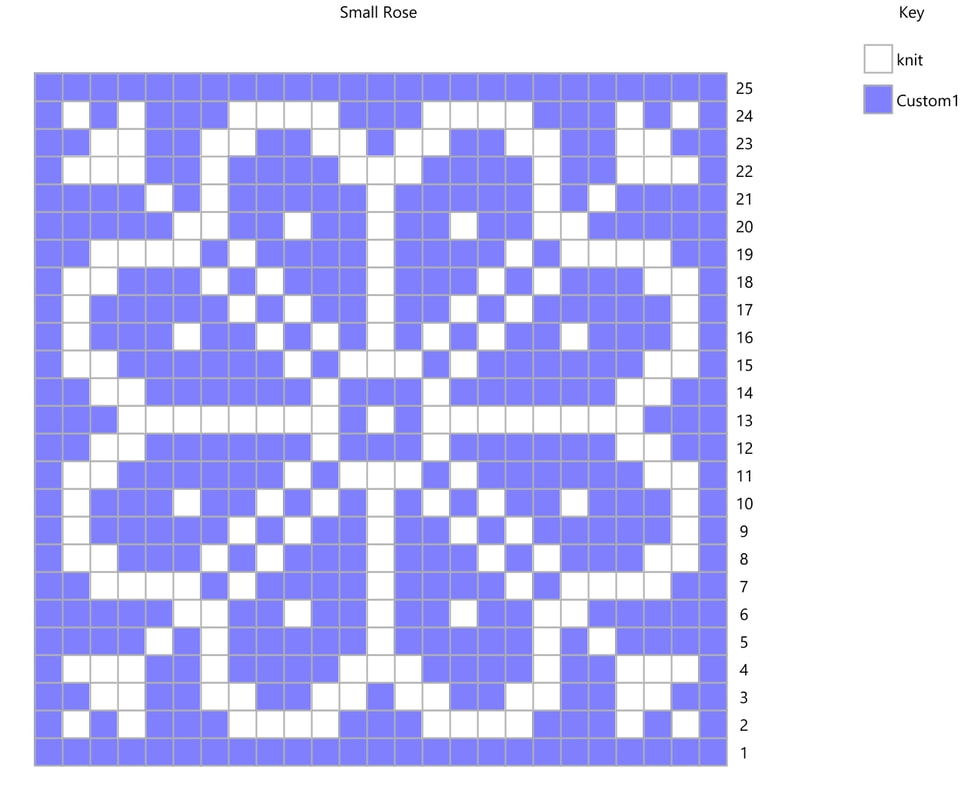 Here I've updated all the corner patterns with my favorite design, modified the center of the rose to be a little less busy, and added dots at the center of each petal. It's easy to play all day with modifying stitch patterns on graph paper or on the computer, but nothing beats a swatch! Because a knit stitch isn't exactly square, it's important to check your pattern in a swatch to make sure it will turn out the way you want it to. After that, the next step is to place your new design into the pattern you want to use, which will be the topic of the next post.   It's a good thing you can't see behind me, because right now the floor is strewn with yarn, books, knitting needles, WIPs, and all the other overflow from my stash closet. My desk is piled high with books, files, and other odds and ends. There are pictures that still need hanging, that if we're going to be honest have been sitting on the floor for at least a month now. If there's one thing I learned from KonMarie, it's that the mess is telling me I don't have a good place for it all to go. Sometimes it takes me a while to figure out the perfect system, or at least the best system for me. But you can bet by the time my lease is up, I'll have figured out the best way to organize it all. And then I'll move on to another house, and have to figure it out all over again. So it goes. What does this have to do with yarny record-keeping? Everything, in fact. I adore Ravelry, but have to admit that I'm not great at keeping up with my projects page. And the problem with Ravelry project pages is that there's no spot to physically insert your samples and swatches. I guess I just love a tactile experience, and I'm much more likely to write it down if I use a pen and paper. That, my friends, is where you get to benefit. If you're the pen and paper sort, I've created notes pages that I love. It all started with weaving, where I needed to keep track of yarn and samples and the changes I wanted to make to weaving drafts. Then, mostly because making them is so much fun, I came up with versions for knitting and rug hooking. Each file is a little different, because each craft is a little different. Don't need a page? Don't print it. Need an extra page? Print two, or three, or more.
Weaving notes have a grid for you to put in your weaving draft. I've left the grid plain so you can customize it to your number of shafts, and so you can put the tie-ups wherever you like. There's also a space for calculating warp and weft requirements, time tracking, and my favorite, a spot for changes you want to make in the future.
Knitting notes has all the essentials, like a place to put your swatch, record your gauge, and remember which yarn and needles you used. But it also has prompts for things I always wished I'd remembered to write down, like how the yarn was to knit with, things I'd change in the future, and how well the item wears.
Rug hooking notes has a space for a sketch of the project and lots of yarn/rag samples. It also helps you track your time and remember things you'd do differently next time. I had a ton of fun making these templates, and I hope you enjoy using them. I've already got my binders labeled and ready to organize everything I make. Now I just have to tackle that mess behind me... xx,
Pamela |
Archives
January 2024
Categories
All
|
||||||||||||||||||||||
 RSS Feed