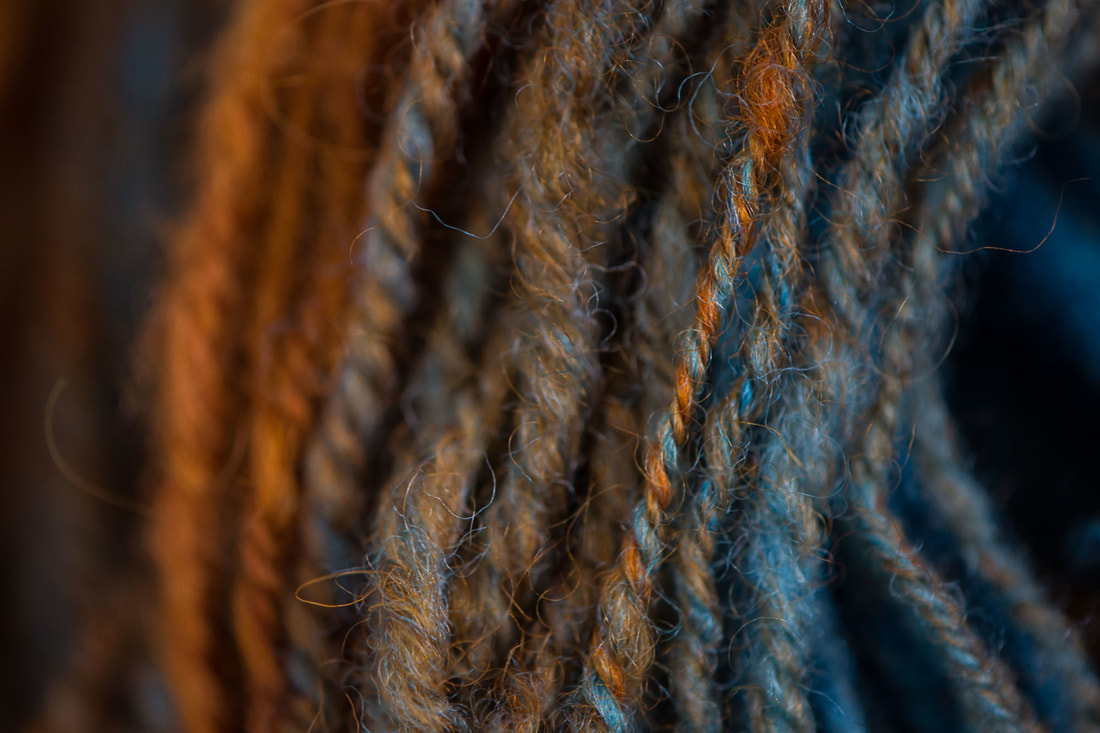
 July means Tour de France. And while those batty bikers are spinning their wheels, silly spinners are spinning our wheels in Tour de Fleece - a loosely organized spinning challenge where the only ones we compete against are ourselves. We spin yarn while the bikers are riding, and rest while they rest. The idea is to challenge ourselves to something new, something big for us. This is the first year I've participated, and my challenge is play. To play with yarns textures, colors, and techniques I haven't tried before. To make lots of instant-gratification skeins (aka mini skeins) with no attachment to what they will become. A three-week workshop of fun, if you will. This week I spent some time playing in the mud. Not in the backyard, but on my spinning wheel. I was playing with making the color “mud” – on purpose. Lots of people will tell you that it’s a big no-no to mix complementary colors. They’ll tell you that mixing complementary colors will get you “mud,” and that you’ll be disappointed by it. But what “they” don’t tell you is that mud can be beautiful and fun. (Just ask any kid covered in real mud!) 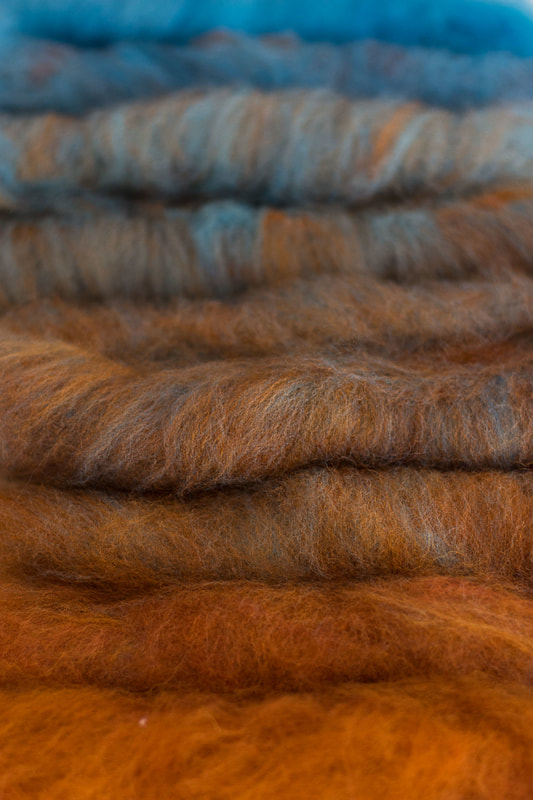 A crash course in color theory:
That's really all there is to it! The colors are often arranged in a color wheel, which is essentially the rainbow put into a circle: red, orange, yellow, blue, green, and purple. Colors opposite each other on the color wheel are considered complementary colors, or opposite from each other. These pairs are: red/green, blue/orange, and yellow/purple. The nifty thing about complementary colors is that each pair contains all three of the primary colors: one as pure primary color, and the other as a mix of the other two primary colors. For the complementary color pair of orange and blue, blue is the pure primary color, and orange is a mix of the primaries red and orange. The colors look satisfying together because they are opposites. They balance each other out. Think of college colors or sports teams – strong, opposite colors makes a strong and yet cohesive statement. The Denver Broncos, University of Virginia Cavaliers, and New England Patriots all use blue and orange as their team colors. I could go on, but I’d rather spend time playing with yarn than talking about sports. 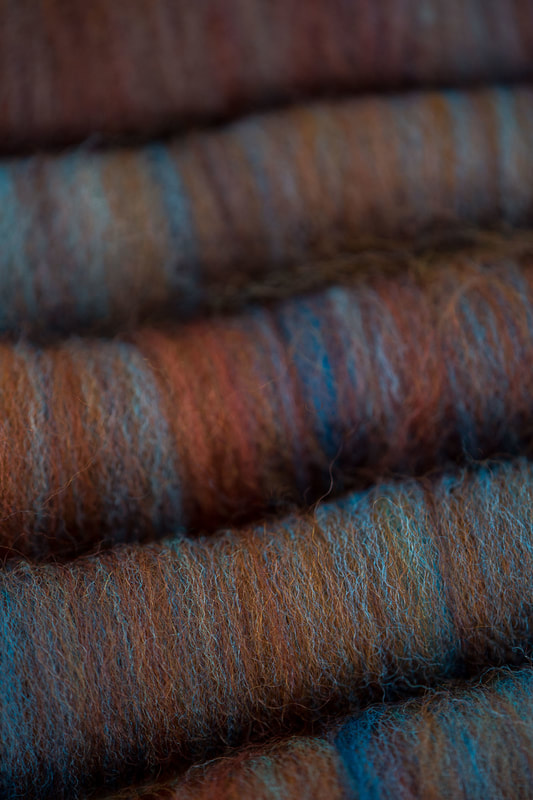 What happens when you mix complementary colors, like paint? As with all things, it depends. It depends on the intensity of the colors you mix, the proportions you mix them in, and how thoroughly you mix them. But the general consensus is that when you mix equal amounts and strengths of complementary colors, you’re likely to get “mud,” which is often brown, black, or a grayish color. Mud is the color that dashes the hopes of many an aspiring dyer or artist. They combine two colors that look great side-by-side and are disappointed the two didn’t combine to make something equally bright and exciting. Because all three primaries are represented in a mixture of complementary colors, they all tone each other down into a neutral. Sometimes this neutral is a dull, boring color. And sometimes it is rich, subtle, and intriguing. As someone who really loves neutral colors, this is a fun place to play. What happens when I add just a little bit of blue to orange? Or just a little bit of orange to blue? That’s what I was thinking when I decided to play in the mud this week. I wanted to show that mud isn’t something to fear. It’s something to understand, and use when it suits us. It’s something to help us achieve those subtle, complex colors that make people do a double take. What color is that? I love your colors! First, I started out with truly playing. I took a braid of blue that I dyed a while back. In truth, I really don’t love this color blue – it’s too flat, too plain, too cold. It’s not my color. For my orange, I took a braid of Lisa Souza’s BFL. My braid says the color is Deep Autumn, but it’s pretty darn close to her current color Aww-Tum. I randomly put the two onto my blending board as the spirit moved me, then made a handful of rolags and spun my heart out. I wound the singles into a center-pull ball and plied it into a two-ply from there. Here’s the result: 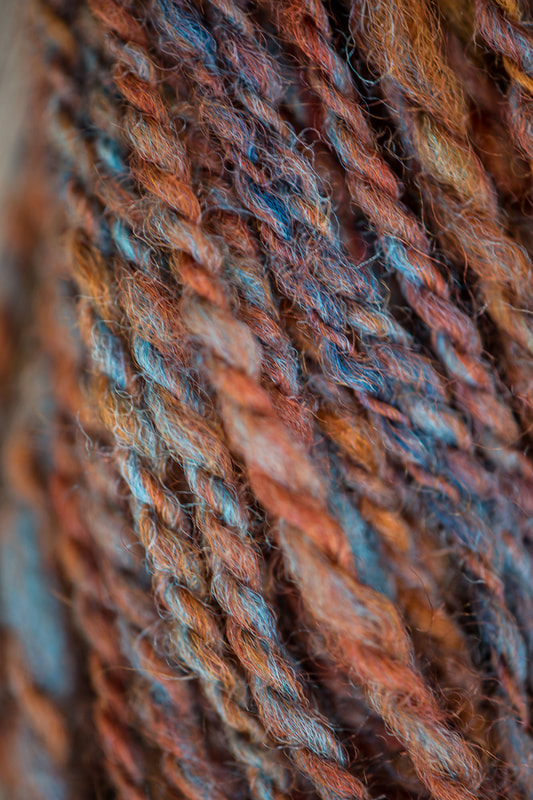 I had so much fun with that experiment, the next day I wanted to get a better handle on exactly what that color combination was that I loved so much. So this time, I had a little more of a controlled playtime. I wanted smallish samples, so I set my scale to grams. I made a gradient where each sample was 3-4 grams total. I started with 100% orange, then 90% orange/10% blue (this is my best guess, as that small of an amount didn’t register with my scale), 75% orange/25% blue, 67% orange/33% blue, 50% orange/50% blue, 33% orange/67% blue, 25% orange/75% blue, 10% orange/90% blue, and 100% blue. Maybe I got a little bit carried away! 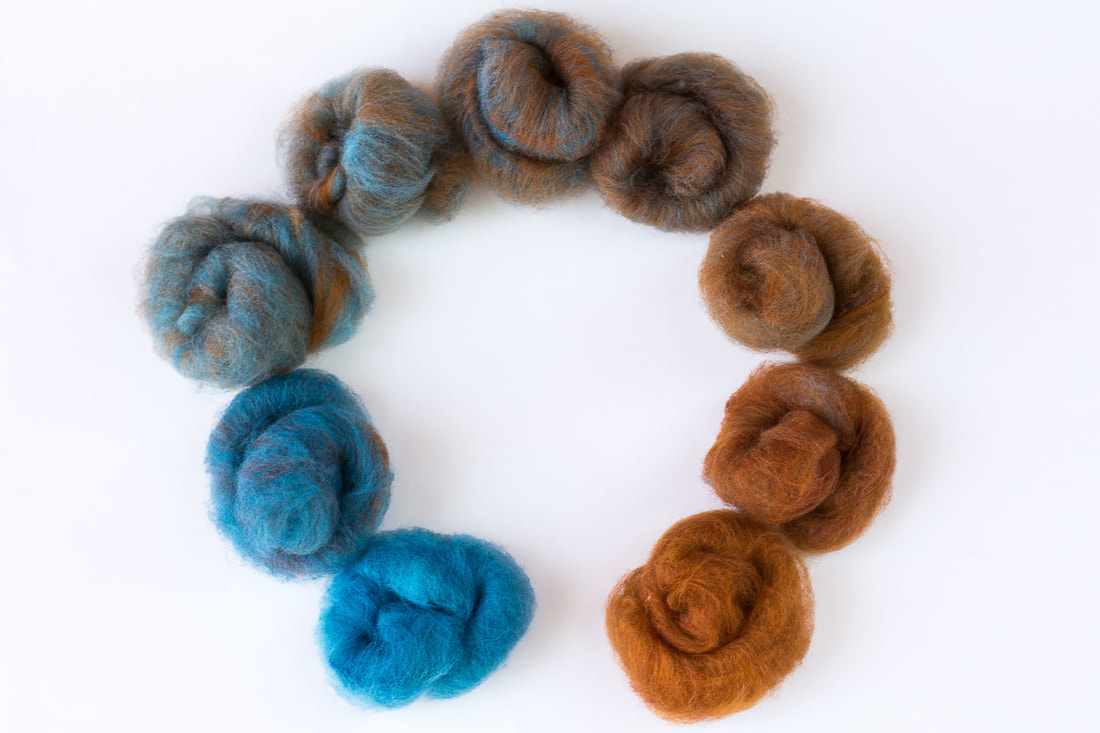 Then I set about carding the colors together so they were well blended. Each color blend got its own rolag, and I found that 4 grams of fiber is about the max my handcards can comfortably hold. After carding, it was time to spin. As Norman Kennedy says, “Good carding – your yarn’s half spun.” But my wheel was acting up – she’s a grouchy old lady who complains when her joints are out of whack. My fiber prep felt great and easy to spin, but treadling my wheel felt like walking through sand. (Or mud! 😊) It took me just about all of my spinning session to get the wheel adjusted just right to where I was actually moving. I spun the gradient in order, then chain plied to keep the color progression from orange to blue. I found that my favorite colors in this gradient are on the orange side, though the 75% blue/25% orange mixture reminds me of a lovely oxidized copper. 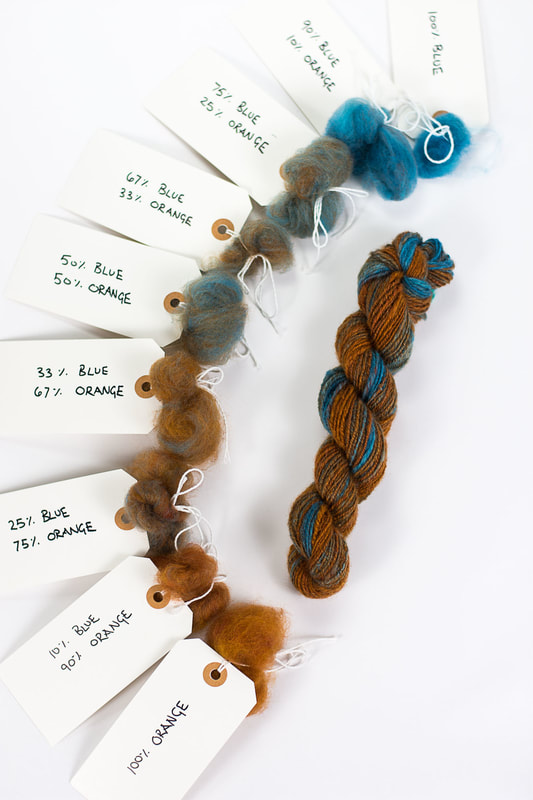 Using the technique of mixing mud on purpose can be really useful in colorwork of all kinds – you can create deep and intriguing colors that blend and speak with each other. And I'm not just talking about stranded colorwork in knitting - there are interesting places for this technique in anything that uses fiber and color, including weaving, crochet, rug hooking, rug punching, embroidery, you name it! If you’re using an orange and want a brown, why not make it yourself by blending your orange with a navy blue? You’ll get something that is much more related to your orange because it already contains your orange. You can create a whole range of complex and deep colors from just a basic few. (Though I'll never tell you that you shouldn't add a fun new color to your stash!) Making mud on purpose isn’t just fun – it gives you a huge range of complex colors to play with. All you need is a tiny understanding of color theory and practice, practice, practice! xx,
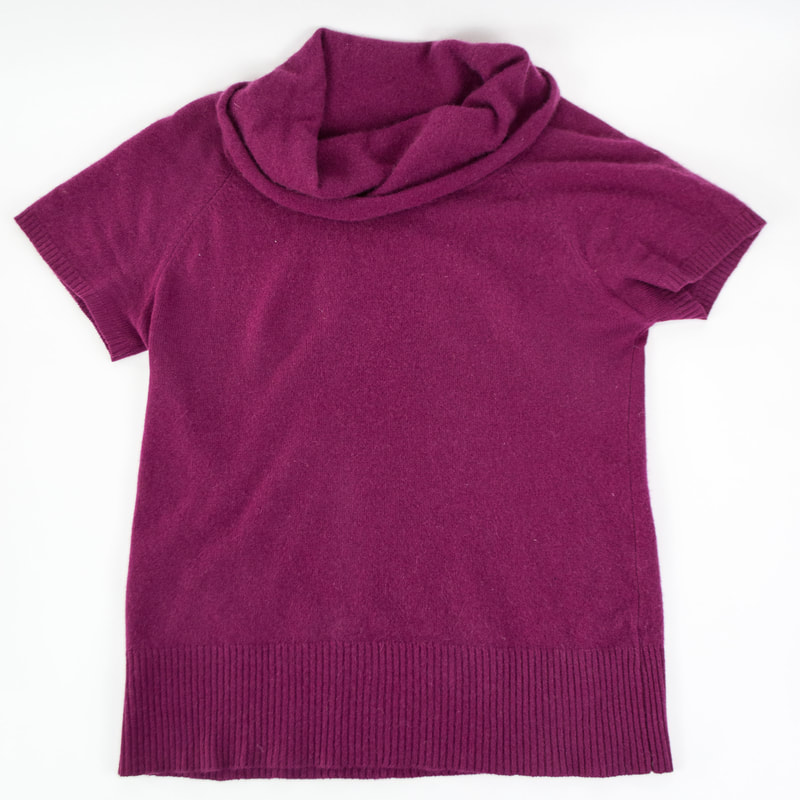
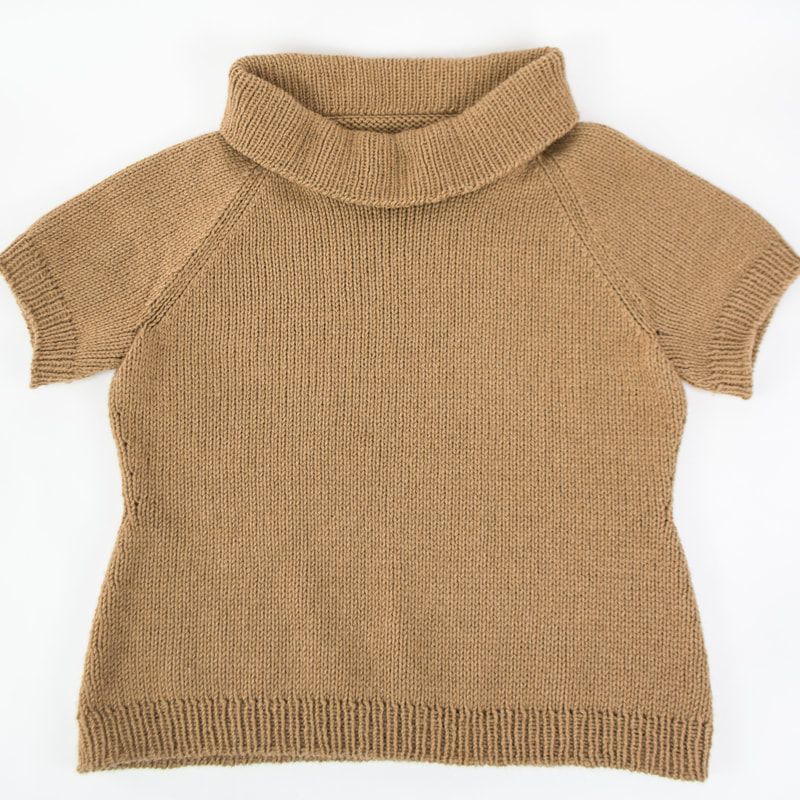
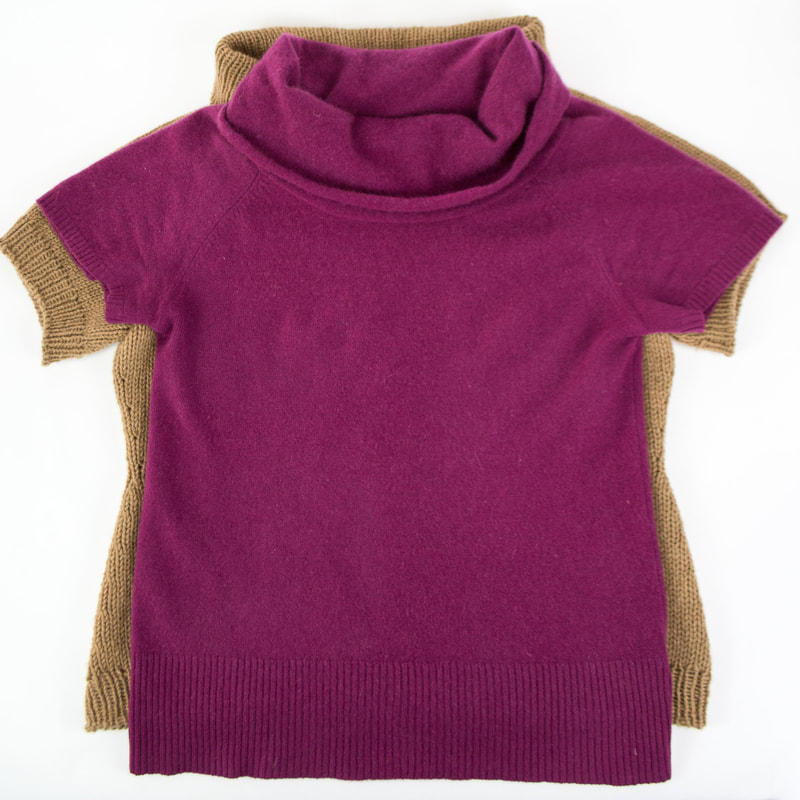
Pamela 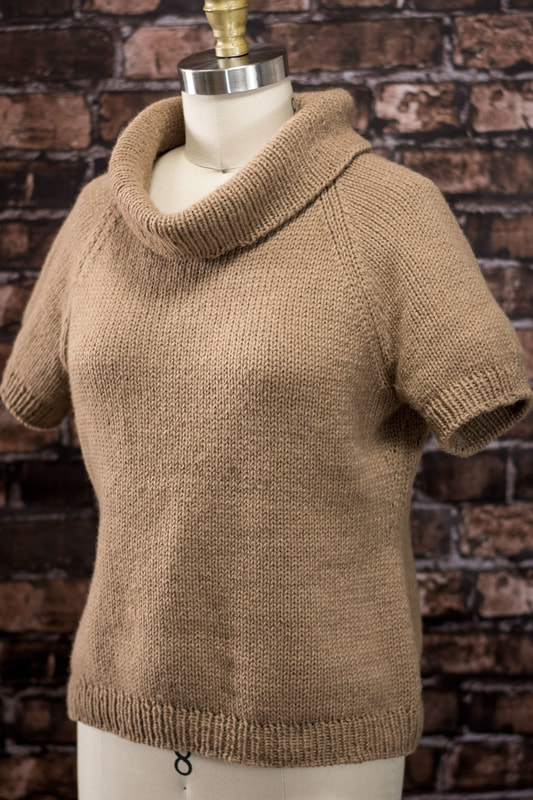 Well, this sweater has been on my "want to knit" list for quite a while, and it wasn't even really on my radar for February projects. And here it is, all finished and wearable and cozy. So much for planning! I was getting ready to meet up with my mom in Denver, and feeling a little out of sorts about my wardrobe options, when I came down with what I lovingly call "Easter Sunday Syndrome." My mom, an incredible sewist, always had to have a new dress to wear for Easter, Christmas, and other big events. And, like any good procrastinator, she often started the project a little late, and would be putting the finishing touches on her new garment as the rest of us were ready to walk out the door. I always thought it a little silly when I was a kid- why not wear a perfectly good outfit you already have instead of stressing out so much? Of course, such a thought is a wicked invitation for karma to turn the tables on me. The Sunday afternoon before my trip, I found myself between projects. Waiting on freshly dyed yarn to dry, without the time to dye more, and not wanting to do anything on my actual to-do list, I pulled out this yarn from my stash. I've had this sweater in my mind for ages, and figured it would be a good practice project for my knitting machine. I started with Melissa Leapman's new book, 6,000+ Pullover Possibilities. I faithfully took my measurements, swatched, and figured out the pattern. Over the next few days, I made each piece of the sweater. A couple of days before my trip, I seamed the sweater. I was in good shape. All I would have to do was knit the edgings, and I'd have a brand new sweater to wear. Then I tried it on. It was huge. As I'd steamed the pattern pieces, I'd thought, am I really that big around? The answer, it turns out, is a resounding no. The sweater had completely left the realm of flattering positive ease, and was positively sacklike. And of course, that natural camel color didn't help. 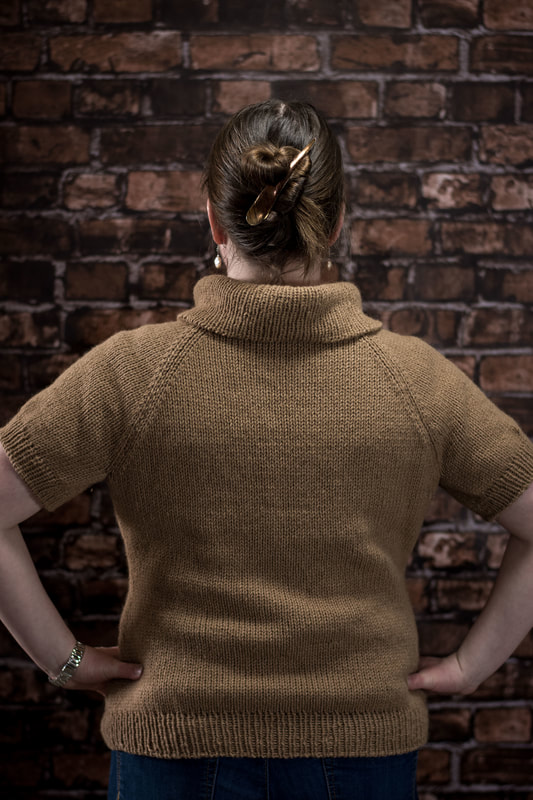 The only thing to do was rip it out. I re-skeined the yarn, and steamed it on the swift. Then it was back to square one. This time, I used my actual body measurements in combination with my gauge swatch, plus the measurements from an existing sweater. And, more than a little frustrated by the first book, I turned to Sally Melville's Knitting Pattern Essentials to fill in a few gaps. The second version ended up taking a whole couple of skeins less than the first, and looked much closer to what I expected when I finally laid them out on the blocking mats. So instead of packing a finished sweater, I was packing freshly-blocked sweater pieces to take with me (after staying up late and waking up early in the race to the finish). At least I had eight hours on the train instead of driving. By the time I got off the train, I was almost done with the ribbing on one sleeve, and picked the sweater up every now and then over the next week. I'd toyed with the idea of doing brioche or some fancy cables at the cowlneck, but as I got started on it, I was away from my library of stitch dictionaries, and ended up with plain old 1x1 ribbing. Which is just as well, since I've always thought of this sweater in my mind as a super-basic piece. Which is what I have now, just a little bit later than I'd originally planned! Above is the original sweater I was trying to imitate - a cashmere sweater I bought on sale in college that was mysteriously sized as "one size fits all." It did, in fact, fit me, and I still wear it, though it's a lot tighter around my middle bits than it used to be. For the camel version, I opted for waist shaping - a little wider at the hips than at the bust, since that's how I'm shaped - and for the back neck to come up a little higher. I'd intended for the camel version to be longer on me than the original, and so I was a bit surprised when I laid one on top of the other. The camel version is actually an inch shorter! The armholes are a bit deeper, and I suspect that I feel like the pink cashmere sweater is too short because it's getting stretched out around my tummy. 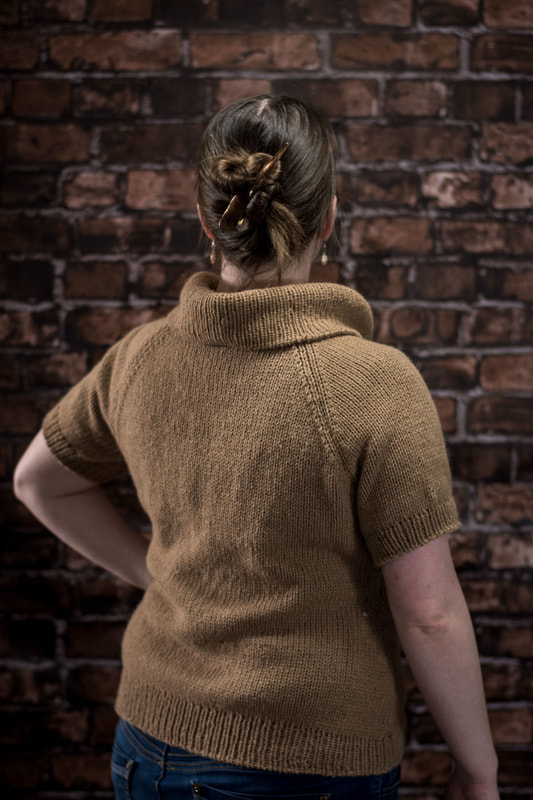 This camel sweater is really all about the yarn, and what yarn it is! I used 6 skeins of "Clever Camel," a 100% baby camel yarn. I originally bought it in April of 2016, spurred on by Karen Templer's Channel Cardigan and the promise of 10% off. I bought 10 skeins, thinking the Channel Cardigan or something like it would be luscious, but I'd just finished spinning the yarn for a Corriedale cardigan, and the colors were just too close. I knew I didn't need (or particularly want) two very similarly colored cardigans, so I came up with the idea for a knockoff of my beloved pink cashmere cowlneck tee. I dutifully made a couple of different swatches, and was amazed by how versatile this yarn is. It looked great at several different gauges, and all were still lusciously soft and pliable. Plus, I carried one of the swatches around with me for several days, subjecting it to all kinds of abrasion, and it wore like a champ. Just the slightest halo and no pills. Part of this magic is because the yarn is composed of 6 plies, which any spinner will tell you helps to reduce pilling. Of course, the journey from swatch to sweater is filled with many twists and turns, and my initial attempts at this sweater were less than exciting. So really the yarn has been sitting in my stash waiting to become something for at least a year and a half now. When the thought occurred to me that it would make great practice for the knitting machine, I felt a little sacrilegious. I spent all that money on this soft and smooshy yarn - shouldn't I spend lots of time knitting with it by hand, feeling that sweet baby camel hair slip through my fingers? In the end, I decided it was worse for the yarn to keep sitting in the stash, and that I'd get plenty of time enjoying the yarn when it was made up into a sweater that I could actually wear. Ironically, the 6 plies that make this yarn fabulous for its anti-pilling properties made it a little bit of a challenge to knit on the knitting machine. There are a couple of snags where stitches split that I need to go back and repair. But overall, I'm thrilled to add this sweater to my wardrobe, and I'm looking forward to more adventures with my knitting machine. xx,
Pamela When I was a new knitter, I would have gasped if you told me to cut apart my knitting. No way, no ma'am. I distinctly remember a red Aran sweater my mother had - full of bobbles, cables, and knit at such a tight gauge it makes my fingers hurt just thinking about it. But she never wore it because it was too big on her. So she cut it apart and incorporated parts of the sweater into a lovely fitted jacket. I was shocked. Won't it unravel? Who would cut into a knitted garment that someone had clearly spent so much time on? The truth is, that while knitting does unravel, there are lots of ways to cut knitted fabric. Steeking is perhaps my favorite and most-used method, and this sweater does indeed have a steek running down the front. Some design and fit issues left me less than thrilled with the finished product. That's the thing about experiments - they don't always work. My problems with this sweater were:
I'd already woven in lots of ends, which makes unraveling difficult. Plus, the yarns (mostly handspun Icelandic thel and Shetland Spindrift) don't unravel so easily. Which makes them great for steeking, but not for correcting my mistakes. So I decided to try something I haven't tried before. I cut the yoke right off, and picked up the live stitches onto my knitting needles, and the sweater is ready for yoke attempt #2. It was easier than I could have imagined. Some tips:
It's also possible to do it the other way - say I had knit the sweater top-down and wanted to replace only the yoke. I'd cut just like I did, but then I'd need to graft the new yoke to the old one. This sometimes leaves a bit of a line, but it's definitely doable. I'd hoped that the end of January would mean that I have a new sweater to wear, but ultimately I want a sweater that is actually wearable, and that I like, so I'm willing to have it take more time. xx,
Pamela  My handspun sweater is at that stage of doneness where it is wearable as a garment, but still needs a few finishing touches – sewing up those faux seams, adding some handwoven ribbon to keep the steeked edges covered, and there might still be a couple of ends that need weaving in. But we managed to get out to the park for a walk in the sunshine, and it was the perfect layer for a spring-like day (in January!). Last week I filmed myself cutting the steek down the center front. Traditionally, steeks are cut in colorwork – a way to speed up the knitting, since colorwork is easier done in the round than worked flat. Really though, you can use a steek just about anywhere – as long as you’re using a yarn that’s not too slippery. Knitting the sweater in the round and then steeking it let me accomplish a couple of things. First, I was using handspun, which has more variety in thickness and color from skein to skein than commercial yarn. Knitting the sweater in the round meant that it would be visually even – no need to try to juggle matching left front to right front. Second, it meant I could knit a stockinette sweater with very little purling. Actually I did purl – the center front has one purl stitch, and each side has a purl stitch where the seam will be. The purl in the center front made for an easy visual for where to steek, and the side purls are there for a faux seam and to add a little bit of structure. But that’s it! Steeking intimidates a lot of people because it seems so dangerous! Won’t the knitting unravel? Interestingly, knit stitches don’t really want to unravel in the direction a steek is normally cut, which helps soothe most people’s fears. When you cut a steek, there are a couple of different ways to reinforce it to keep all your hard work from unraveling. The two main techniques I’ve seen are using a sewing machine and crocheted reinforcement. Using a Sewing Machine to Reinforce a Steek The idea is simple: sew a couple of rows of stitches just outside the cut. The machine-sewn stitches are strong and disappear into the fabric. You do have to be careful not to stretch the knitting as it goes through the sewing machine, or else risk a “ruffly” edge, but this technique is great for yarns that might not traditionally be steeked, like cotton or acrylic. You can find a bunch of great tips about machine sewn steeks here. Reinforcing a Steek With Crochet Stitches This technique uses two columns of crocheted stitches just outside the column of stitches to be cut. The crocheted stitches pull away from each other, leaving you a clear cutting path. Once cut, they roll under whatever edging you add, giving you a nice edge. This is my go-to tutorial for the crocheted method. This second technique is the one I used for my sweater, partially because I like it, and partially because I didn’t want to haul out the sewing machine. Then it was just snip, snip, snip, and I had a cardigan instead of a pullover. I’ve heard a lot over on Instagram about how daunting steeks can seem, but they’re really useful in a lot of situations. Maybe I’m a little obsessed, but I think every knitter should try steeking at least once! Do you have any experience with steeking? I’d love to hear about it – or any questions you might have about the process. I’m all ears! xx,
Pamela 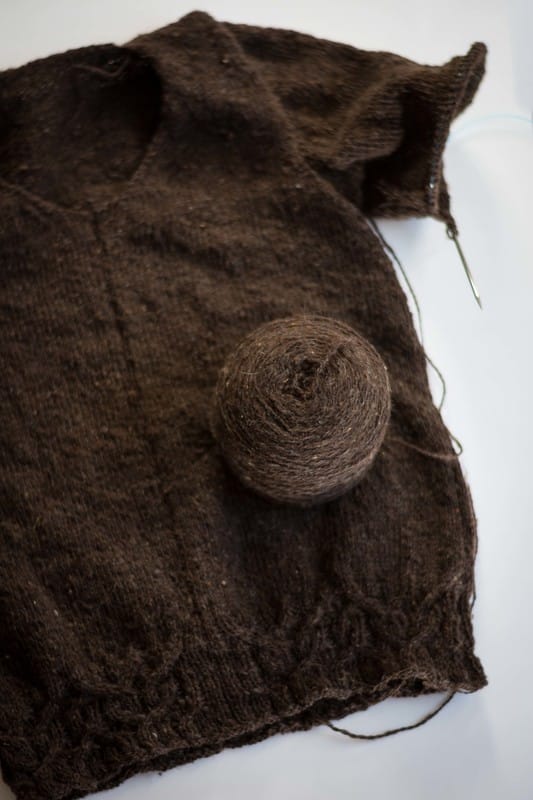 Ever since I saw it, I wanted a cardigan like Velvet Morning. It checks all the boxes for me - gorgeous, cozy-looking, simple but with lovely colorwork details, and of course, it's a cardigan, which is my favorite kind of sweater. I'd make a few changes though. I'd knit it in a lighter weight yarn, since I don't live in Canada like the pattern designer. I'd give it some V-neck shaping, because that's my neckline of choice, and I'd knit it in the round and steek it instead of knitting it flat and seaming it. Oh, and I'd make my own colorwork patterns inspired by my travels. Basically, I'd design a whole new sweater with Velvet Morning as the inspiration. This is not that sweater. I meant for it to be, and then all of a sudden I had sailed right past the place where the colorwork needed to start. And being the type of person who would rather plow ahead instead of rip back, plow ahead is what I did. 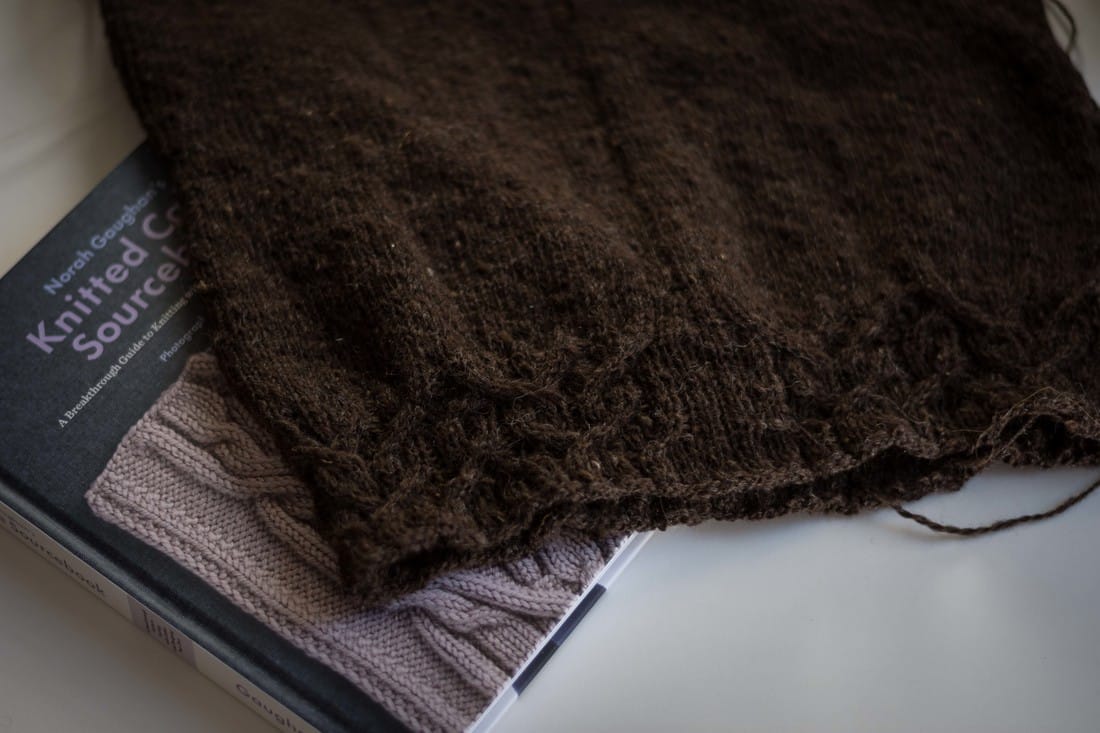 As I knit the body, I was a little sad that I was making "another boring sweater" and wondered how I could spice it up. When I got to the ribbing, I had the bright idea to try cables. The classic cables were still too boring for my taste, so I pulled out the new Knitted Cable Sourcebook by Norah Gaughan. I ended up with cable pattern #112 "Fusion," which fit neatly into my stitch count and is based on a 2/2 rib. I'm hoping those ripples between the body and the ribbing block out - I do think they will, since the swatch stretched pretty considerably after I washed it. Knitting the cables in dark brown wasn't quite as difficult as I thought it might be, and I'm happy that I'll have a subtle bit of texture on this sweater after all. xx, Pamela p.s. -- My Velvet Morning-inspired sweater is totally still in the queue!
|
Archives
January 2024
Categories
All
|
 RSS Feed